Cordova CLI Builder
- Windows PC Android SDK installation and setup for deploying Cordova Apps
- Mac OSX Cordova Installation
- Upgrading Cordova
- Using the Cordova CLI Builder
- The Cordova CLI Builder
- Build Specifications
- Android Build Options
- Production Android App Credentials
- Post APK Build Behavior
- Cloud Storage Properties
- Generating Build Bundles for New Google Play Store Submission
- Android Studio Gradle Plugin
- Feature Comparison, Cordova iOS versions 7.00 and 6.x.x vs Cordova iOS 5.1.1
- iOS Build Options
- Xcode CLI Builds
- For Xcode Builds
- For More Information
- Videos
Description
Alpha Anywhere includes a CLI build option in the Cordova App Builder. Support is provided for Android builds on a Windows PC and iOS builds on a Mac.
Discussion
For Android, the build scripts will build an Android APK file, installing all requested plugins. Options are provided to install the APK file on an Android device through the USB debug cable, by scanning a QR Code or the APK can be uploaded to the cloud so that it could be shared and installed by a group of test users.
If you plan to publish your app to the Google Play Store, make sure to install Cordova 12.0.0 or later. This is required to support Android SDK 33 (a requirment as of August 2023), the latest release of the Android SDK that is supported by Cordova Android which meets the requirements for Google Play Store app submission. If you have a previous version of Cordova installed, refer to the section on updating Cordova.
For iOS apps, the builder will package up all of the required app files into a zip file and generate a Bash shell script to build the Cordova App on a Mac.
The Cordova CLI provides a command line interface for creating Cordova apps. It is supported on OSX and Windows development machines and requires the developer to install the Cordova CLI and the native app developer tools on the development machine.
If you want to build iOS apps using the Cordova CLI, you will need a Mac with the Cordova CLI and Xcode installed. You will also need an Apple Developer Account.
To develop Android apps on a Windows PC you will need to install the Java SE Development Kit (JDK), NodeJS, NPM, the Android SDK (or Android Studio) and the Cordova CLI.
These setup instructions apply to Alpha Anywhere 12.4.6.5.0 (build 8705) and newer.
Windows PC Android SDK installation and setup for deploying Cordova Apps
Install the Java SE Development Kit 11.0.16.1
Install Gradle
a. See https://gradle.org/install/
The minimum version of Gradle for Cordova app development is 6.5. For Cordova Android 12, install Gradle 7.6.
Install Git
a. Follow the installation instructions here.
Install Node.js
a. Download the installer from https://nodejs.org/
Node 12 is no longer supported. As of August 2022, the LTS version of Node is v16 and should be the minimum version installed.
Node.js needs to be added to the PATH environment variable, which is done by default.
b. To test the installation, open up a new command window and type:
node --version
The version number should be displayed.
You can open the command window from within Alpha Anywhere by clicking the
 Open Windows CMD Window button in the toolbar on the Web Projects Control Panel.
Install Cordova
a. From a command window, enter the following:
npm install -g [email protected]
b. To verify proper installation, from the command window enter:
cordova -v
The cordova -v command displays the version of Cordova that is installed.
Install Android Studio
b. After installing Android Studio, you must install the packages for the the API you wish to target. Locate the SDK Manager icon in the upper right-hand corner of Android Studio.

Select the target platforms on the SDK Platforms tab and click OK. If you plan to deploy your app to Google Play, make sure you meet Google Play Store Requirements for the minimum SDK version. As of August 2023, the latest API level supported by Cordova Android is API level 33 (Android Tiramisu).
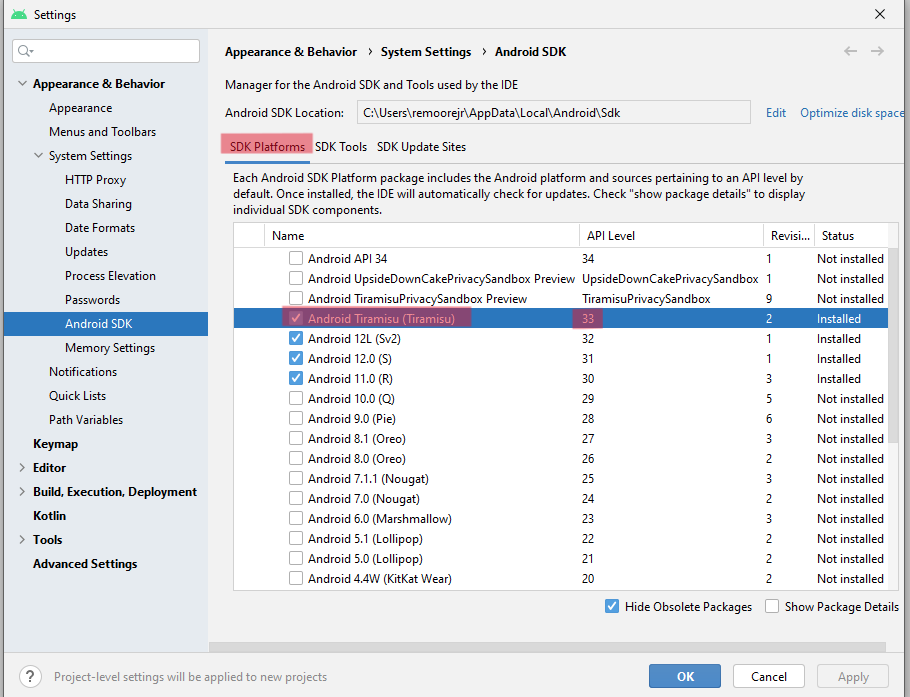
See Android Studio's Update the IDE and SDK Tools help article for more information.
Cordova Android 12.x.x is required for any apps submitted to the Google Play store as of August, 2023.
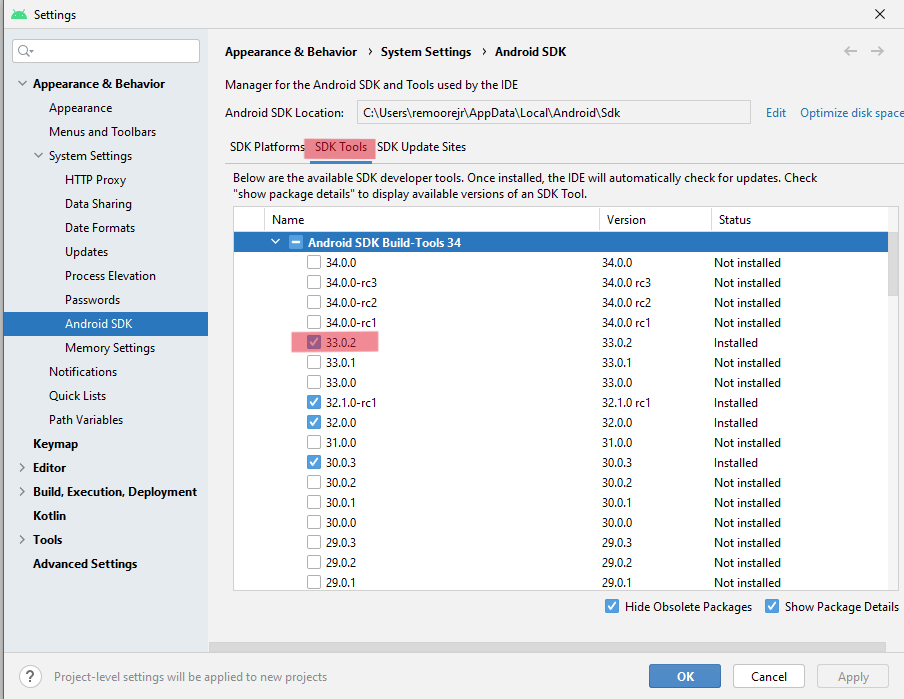
Cordova Android 12 requires Android SDK Build Tools version 33.0.2.
Cordova CLI 10.x.x and Cordova CLI 11.x.x that targets Cordova Android 10.x.x requires Android SDK Build Tools version 30.0.3, which is neither the latest release nor installed by default. To install the Android SDK Build Tools version 30.0.3, from within Android Studio click Tools < SDK Tools. Click the Android SDK Tools option. The status may indicate an update is available, however, the update will most likely not work with Cordova. Check the Show Package Details box in the lower right corner to display all available developer tools.
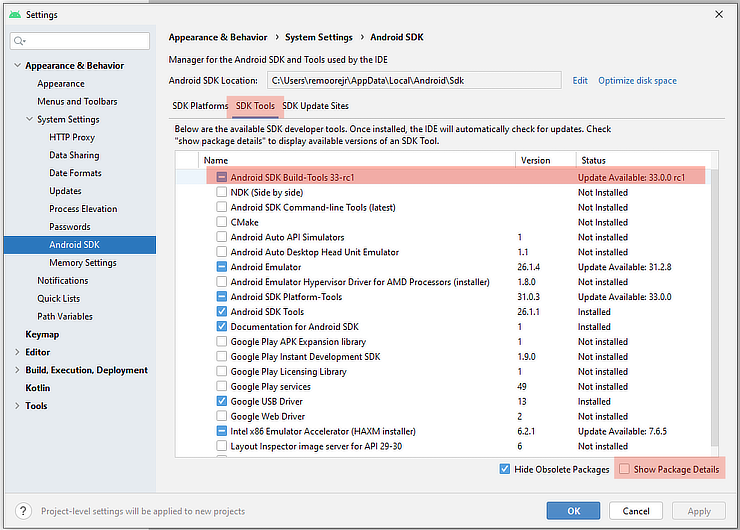
Check Android SDK Build Tools 33.0.2 (when using Cordova Android 12) or Android SDK Build Tools 32.0.0 (when using Cordova Android 11) or 30.0.3 (when using Cordova Android 9 or Cordova Android 10). You can install both SDK Build Tools if you prefer. When installation of Android SDK Build Tools completes, you will be able to build Android Cordova apps with the Alpha Cordova CLI Builder Genie and Android Studio.
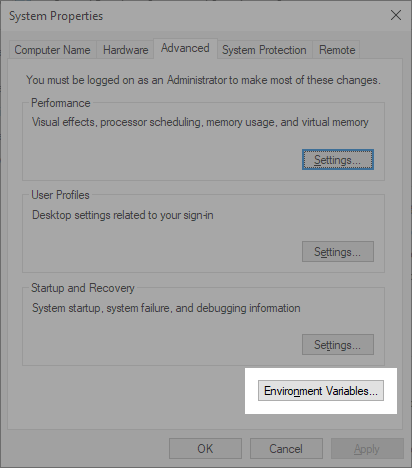
Set the Environment Variables
The Cordova CLI installer attempts to set the required environment variables. However, in certain cases, variables need to be set manually. In Windows, the steps to set the environment variables are dependent on the installed version of Windows. You must close and open any command prompt windows after making the changes for the changes to take effect.
Click on the Start Menu in the lower left corner of the desktop.
In the search bar, search for Environment Variables and select Edit the System Environment Variables.
In the window that appears, click the Environment Variables button.
Click New... and enter the variable name and value.
Set the JAVA_HOME environment variable to the location of the JDK 11.0 installation.
Set the ANDROID_HOME environment variable to the location of the Android SDK installation.
Set the GRADLE_HOME environment variable to the location of the Gradle installation.
 If you are using Cordova Android 10.x.x or less, set the ANDROID_SDK_HOME environment variable instead of ANDROID_HOME. If you prefer, you can set both. That will allow you to use Cordova Android 11 or greater and Cordova Android 10 or less.
Edit the System Path
Select the Path variable and click Edit.
Add the following entries:
%JAVA_HOME%\bin
%ANDROID_HOME%\platform-tools or %ANDROID_SDK_ROOT%\platform-tools
%ANDROID_HOME%\tools or %ANDROID_SDK_ROOT%\tools
%ANDROID_HOME%\gradle\bin or %ANDROID_SDK_ROOT%\gradle\bin
%GRADLE_HOME%\bin

Verifying the Android Cordova CLI Build Environment on Windows
The Android CLI Build - Setup dialog can be used to verify the environment and PATH variables are correct. To access the dialog:
In Alpha Anywhere, click the Open Cordova Project Builder tool on the Web Projects Control Panel.
Next, click Save & Launch Cordova CLI Builder.
The Save & Launch Cordova CLI Builder button is only available when the App Build Target is set to "CLI", Android or iOS is checked, and Initial UX Component is set.
On the Cordova CLI Project Build Properties, check Generate Android Build. This will expose the Check to see if your computer is correctly configured for Android CLI builds link.
Click Check to see if your computer is correctly configured for Android CLI builds to check that your environment and PATH variables are setup correctly.
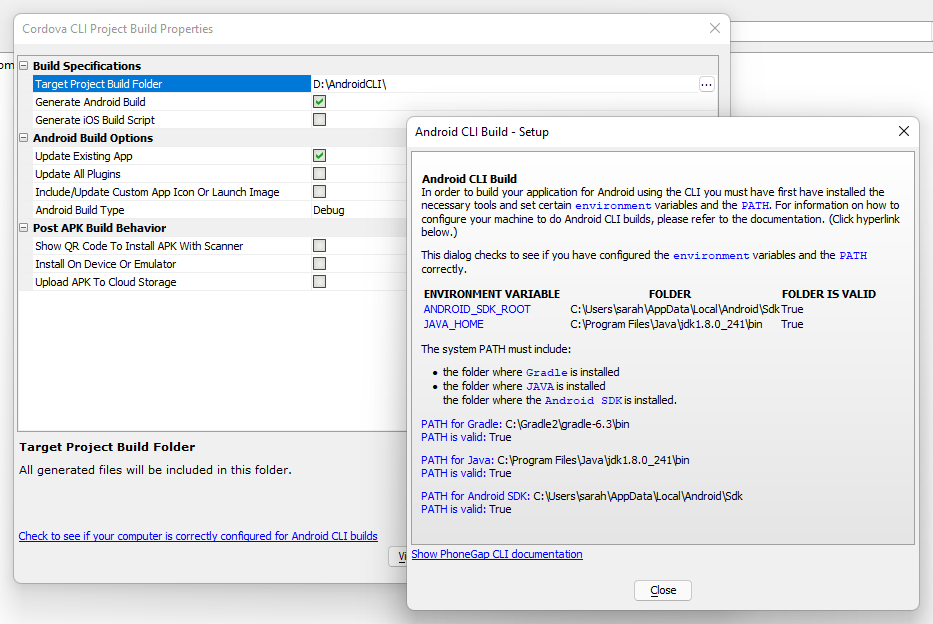 Android CLI Build - Setup dialog
Click Cancel in the Cordova CLI Project Build Properties dialog to return to the Web Projects Control Panel.
Review the information in the dialog. If an environment variable is missing or something is missing from the PATH, review the [Windows PC Android SDK installation and setup for deploying Cordova Apps] section above for instructions on how to setup your environment.
Mac OSX Cordova Installation
Install Xcode (if not previously installed)
See: https://developer.apple.com/xcode/ and click the Download button.
Update iOS-deploy
The latest version of iOS-deploy is required if you plan on using the Xcode CLI tools to build and install the app on a simulator or a device.
To update iOS-deploy, open a terminal and enter:
sudo npm install -g ios-deploy@latest --force
Install Node.js
a. Download the installer from https://nodejs.org/
/usr/local/bin needs to be added to the PATH environment variable, which should done by default. To verify, enter echo $PATH from Terminal.To test the installation, from Terminal, type node --version The version number should be displayed.
Install Cordova
a. From a Terminal window, enter npm install -g [email protected].
b. To verify proper installation, from a Terminal window enter cordova -v, the installed Cordova version will be displayed.
Upgrading Cordova
To upgrade an existing installation of Cordova:
Open a console window. On Windows, open Command Prompt. On Mac, open Terminal.
Uninstall Cordova. Run the following command in the console window:
npm uninstall -g cordova
Mac may require the sudo command. E.g. sudo npm uninstall -g cordova.
Install the latest release of Cordova. Run the following command in the console window:
npm install -g cordova
You can optionally specify a specific version of cordova to install using cordova@version where version is the version number. For example, to install Cordova 12.0.0, run the following command in the console window:
npm install -g [email protected]
Mac may require the sudo command. E.g. sudo npm install -g cordova.
Using the Cordova CLI Builder
From the Cordova App Builder, it is best to start a new Cordova Project to make sure you are using the latest project template files. Project template files change from time to time based on device operating system revisions or revisions to Cordova. Set the App Build Target to CLI.
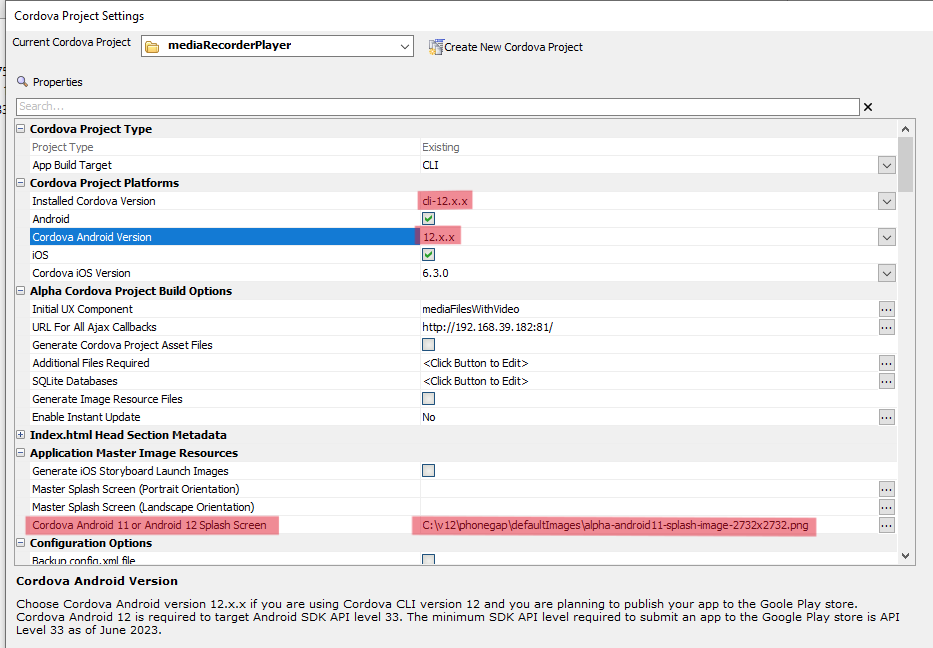
You need to specify the installed Cordova version and if you select cli-11.x.x or cli-12.x.x and have the Android build option checked, you need to specfiy the Cordova Android version that will be used when building the app. Cordova Android 12.x.x is the latest release as of June 2023 and it is required if you wish to publish the app to the Google Play store (as of August 2023).
If you are generating a build for iOS, you can choose one of four versions of Cordova iOS to build your app. Verions 5.x.x and 6.x.x and 7.x.x require different plugins (which will be automatically installed) for handling access to local device files and XHR requests.
Cordova iOS 5.1.1 is the default version if you are using Cordova 10 or earlier and it has been used extensivley over the years to build Cordova iOS apps with Alpha Anywhere. When you build with Cordova iOS 5.1.1 the Cordova Alpha WKWebView plugin is automatically installed along with the associated cordova-plugin-alpha-wkwebview-file-xhr plugin.
The latest version of Cordova iOS is version 7.0.0 and it includes the required WKWebView. It does not require the installation of the Alpha WKWebView Plugin. When you build with Cordova iOS 7.0.0, Cordova iOS 6.3.0 or Cordova iOS 6.2.0, the cordova-plugin-alpha-wkwebview-file-xhr-fix v2.3.0 is automatically installed.

See Feature Comparison, Cordova iOS versions 7.00 and 6.x.x vs Cordova iOS 5.1.1
The options within the Cordova App Builder will be updated to reflect the options that are applicable to a CLI build. Make sure to specify the Application ID properly. The Application ID uses reverse domain naming notation and the CLI app folder created will use the app name specified in this string. For example, if the application id is com.alphasoftware.test1, then the CLI project folder created will be test1. Spaces are not allowed, and the name is automatically converted to lower case, per Android conventions.
The Cordova version used for the CLI build is dictated by the installed Cordova CLI version. To update the Cordova CLI version see Upgrading Cordova.
Configure the rest of the options for your application.
You can select a custom app icon (make sure to use a 512px x 512px image) and splash screen or launch image. If nothing is specified, a default icon and splash screen is used.
If you are building an Android App using Cordova Android 11, a single splash screen at a resolution of 2732px x 2732px is required. If you do not specify a Cordova Android 11 splash screen image a default image will be automatically created. The path to this image will be displayed on the 2nd and subsequent invocations of the Cordova App Builder.
The splash screen handling has changed significantly for Cordova Android 11 and 12. All Android related splash tags in the config.xml file are deprecated and will be removed. The splash screen plugin is also incompatible with Cordova Android 11 and 12 and will be automatically removed if it is enabled.
Cordova Android 11 and 12 requires all apps to use the https protocol for proper operation of ajax callbacks, session vars, session files and cookies. The Alpha Server must have a valid certificate and a valid domain name.
The Alpha Server must have the Advanced /Sessions / Same Site Mode value set to None (requires use of HTTPS).
Within the Cordova Project Settings, the Host Scheme must be set to https and the Host Name Preference must be the domain name.
Specify all of the required plugins for your application. If you are using any plugins that require you to insert a hook, you will need to build the CLI version of the app and then edit the generated source code to include the hook per the plugin documentation. You can then run the Cordova CLI Builder again and update the app.
Once all of the options have been set, select the Save & Launch Cordova CLI Builder button. The Cordova CLI Project Builder Window will appear.

The Cordova CLI Builder

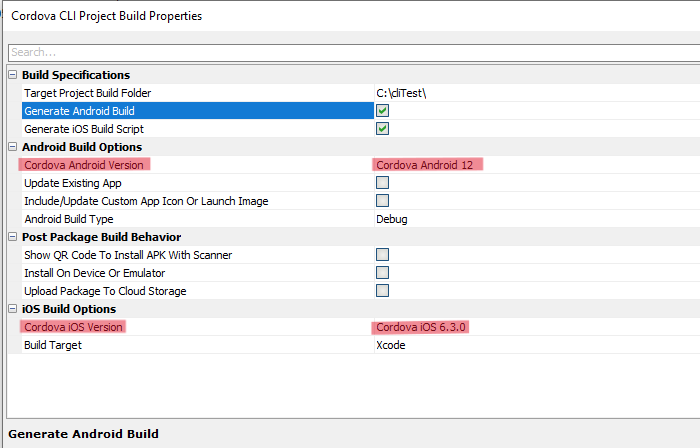
Build Specifications
The first step is to specify the Target Project Build Folder. This will be the root folder for the CLI generated files. If you have specified an Android build, a subfolder will be created with the name of the app ID. If you have specified an iOS build, an iOS files subfolder will be created with a naming convention of appid_iOS_Files. The generated iOS files need to be transferred to a Mac to build an iOS App
Generate Android Build - Check this option to build a Cordova CLI Android project. Once checked, additional Android project related options will appear.
Generate iOS Build - Check this option to package up all of the app files and generate a BASH script for building a Cordova project on a Mac.
Android Build Options
Update Existing App - If checked and an app with the same app id exists within the target project build folder, then only the /www folder will be updated. This allows you to make changes to the base component and update the app quickly. If this option is unchecked and an existing app with the same app id exists within the target project build folder, then all of the app files are deleted and a new project is built. This includes the installation of all plugins.
Update All Plugins - Enable this option if the Update Existing App option is checked and you have added a new plugin to the project.
Include/Update Custom App Icon or Launch Image - If you have generated and included a custom icon or a custom launch image (splash screen), this option needs to be enabled at least once to copy the icon and launch images to the appropriate Cordova Android platform specific folders. This only needs to be done once, so if you are updating an existing app, you can save time by disabling this option on subsequent updates.
Android Build Type - The build type can be either a Debug Build or a Release Build. For development and testing, use a Debug build. When you are ready to deploy the app to Google Play or through an Enterprise Mobile App Manager, use a Release Build. Release Builds must be signed with the appropriate developer credentials. When you select a Release Build, the Credentials and Options For Signed Release Build category is shown.

Production Android App Credentials
Before you begin, review the Android app signing requirements: https://developer.android.com/studio/publish/app-signing.html
Keystore - Select the binary file that holds the set of keys.
Keystore Password - Password to the keystore.
Alias - The ID specifying the private key used for signing the app.
Password - Password for the private key specified.
Keystore Type - Default is auto-detect which is based on the file extension. You can also select the specific pkcs12 or jks extension.

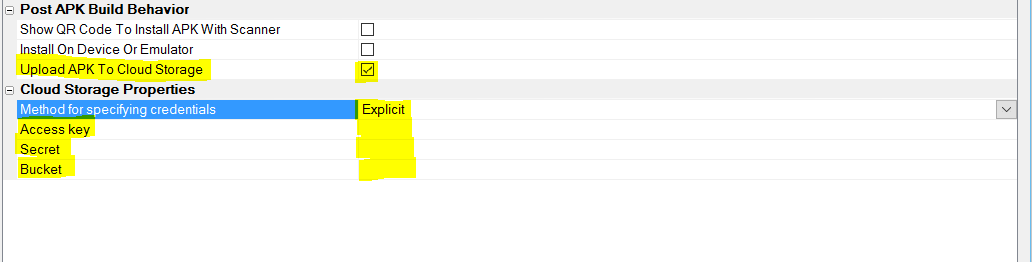
Post APK Build Behavior
The options in this category determine the actions that take place after the Android Cordova project is completed and the APK file is generated.
Show QR Code To Install APK With Scanner - If you would like to install the app on an Android device, enable this option to generate a QR Code that can be scanned to install the APK file. The generated APK file will be copied to the development server (which must be running) and stored in a folder called apk_files/appID (the name of the app).
Install On Device Or Emulator - This option allows the app to be installed on an emulator (if one has been installed and configured) or on an actual device (if USB debugging has been enabled and the Windows device drivers are working properly). Android devices can be very tricky to setup with Windows due to the numerous device drivers available and large variety of Android devices and operating system versions.
Upload APK To Cloud Storage - If you would like to upload the APK file to storage, such as Amazon S3 or Azure, enable this option. Uploading the APK to storage makes it easy to share with others. The Cloud Storage Properties category will be displayed when this option is enabled.
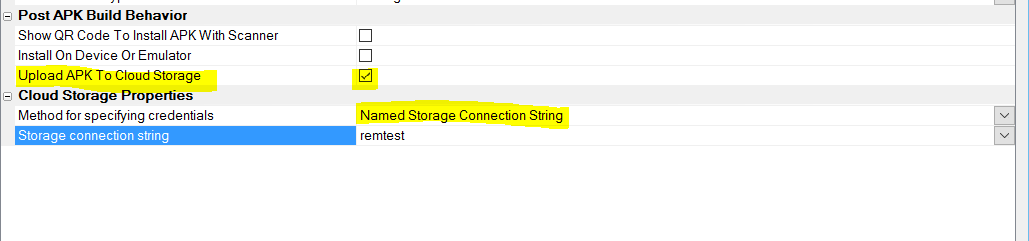
Cloud Storage Properties
Method for specifying credentials - You can specify the cloud storage credentials by selecting a Named Storage Connection String or Explicitly providing the credentials. If you select the Named Storage Connection String Option, the Storage Connection string property will appear, allowing you to select a previously defined storage connection string.
Storage connection string - This will be displayed if the named Storage Connection String option is selected above. Choose a storage connection from the dropdown. If no storage connection is listed, you can create one.
Access key - Displayed when the Explicit option for specifying credentials is selected. Enter your Amazon S3 access key.
Secret - Displayed when the Explicit option for specifying credentials is selected. Enter your Amazon S3 secret key.
Bucket - Displayed when the Explicit option for specifying credentials is selected. Enter the Amazon S3 bucket name.
Generating Build Bundles for New Google Play Store Submission
If you are planning to submit your app to the Google Play Store, you must submit an Android App Bundle. As of August 2021, new app submissions to the Google Play store must include Android App Bundles. This requirement only applies to new apps submitted to the Google Play store.
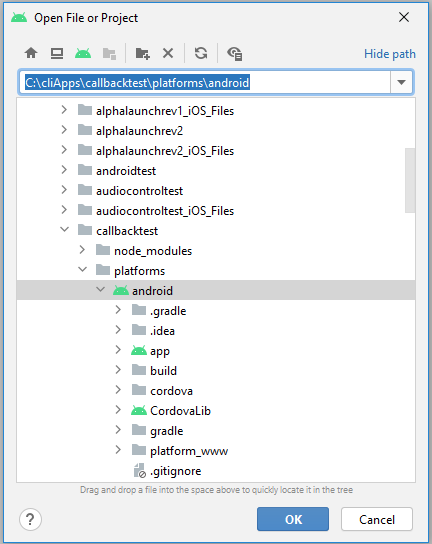
App bundles are created using Android studio. Open the Android Cordova Project in Android Studio for your application and select Build > Build Bundle(s)/APK(s) > Build Bundle(s) from the Android Studio menu.
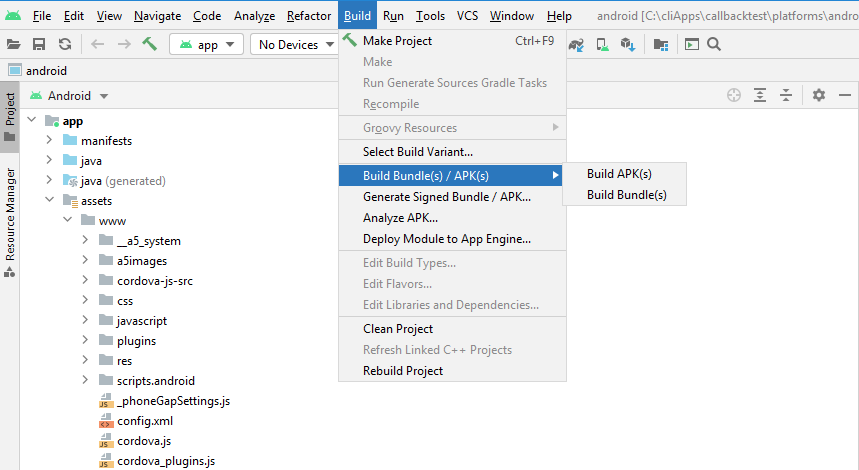
The Android Cordova Project for your app can be found in the projectName/platforms/android directory in the Target Project Build Folder. To open the project, select File > Open from the Android Studio menu. Navigate to the Target Project Build Folder, locate your project, then select the projectName/platforms/android directory.
Refer to Google Play Play Policies for more details about Google Play store app submission requirements.
Android Studio Gradle Plugin
Android apps may be built with Android Studio. To do so, launch Android Studio and open the Platforms/Android folder in the directory that contains the Cordova project files.
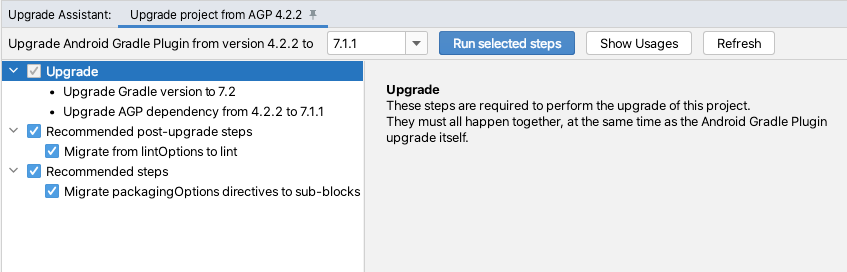
When opening the project, Android Studio may display a prompt, notifying you of a recommended update to the Android Gradle Plugin.

The Android Gradle Plugin (not to be confused with Gradle) is an Android Studio Plugin that provides additional functionality to Gradle when building Android apps.
The Android Gradle Plugin that works with current Cordova projects is 4.x.x. and it is specified and installed by the Cordova CLI builder. Newer versions will not work with the default Java version specified by Cordova. If you would like to update the Android Studio Plugin, you will need to modify Android Studio to use Gradle JDK Version 11.
If you do not want to upgrade and do not want to be prompted to upgrade the Android Gradle plugin every time you load the project, click the "upgraded" link, then click "Don't remind me again for this project".
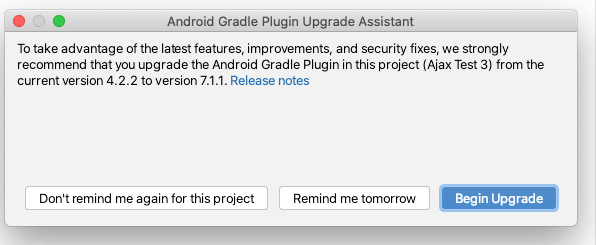
if you want to upgrade the Android Studio Gradle plugin to the latest release, click the "Begin Upgrade button" and the Upgrade Assistant will guide you through the process.
Once the Android Studio Gradle is updated, the app will not successfully build until it is configured to use version 11 of the Gradle JDK.
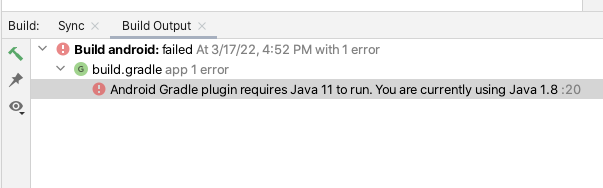
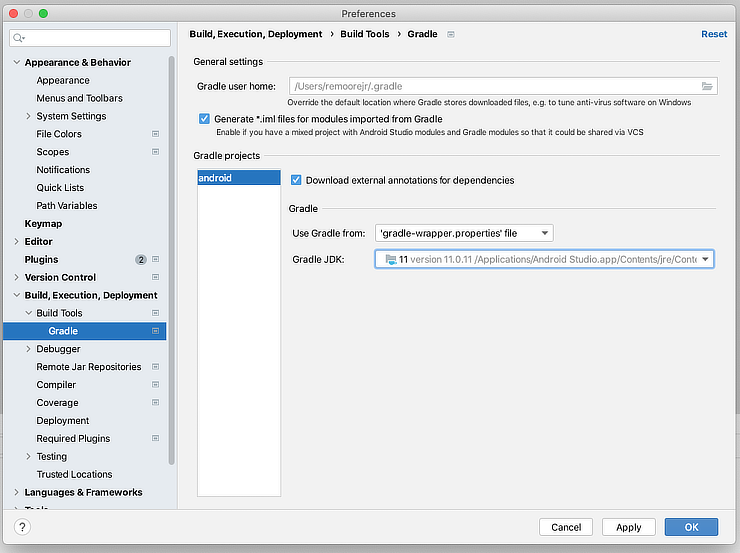
To update the Gradle JDK, open the Android Studio Preferences < Build, Execution, Deployment < Build Tools < Gradle menu. Select version 11 for the Gradle JDK. Click the OK button. Your Cordova app will now build with the latest Android Gradle Plugin.
Feature Comparison, Cordova iOS versions 7.00 and 6.x.x vs Cordova iOS 5.1.1
Cordova iOS 7.0.0 is the latest official release for building Cordova iOS applications and it includes support for Xcode 15 and the iOS 16 SDK. The UIWebView code was removed and replaced with the required WKWebView. As such, it does not require the Alpha WKWebView plugin that is used for Cordova iOS 5.1.1 builds.
Please be aware that some of the newer Cordova plugins may require Cordova iOS 6.x.x or Cordova iOS 7.0.0.
The only operational difference between the WKWebView used in Cordova iOS 7.0.0 and Cordova iOS 6.x.x vs the Alpha WKWebView Plugin used for Cordova iOS 5.1.1 is the inclusion of Apple's QuickLook Framework in the Alpha WKWebView plugin. If you were using the QuickLook features of the Cordova Alpha WKWebView Engine plugin to view files, this functionality will now require the Cordova Open plugin, since the Cordova iOS 7.0.0 and 6.x.x WKWebView does not include the QuickLook framework. For more info on the QuickLook framework see: Apple's QuickLook Framework Documentation
For further information on the changes made to Cordova iOS 6.x.x see Cordova iOS 6.0.0 Blog Post
For further information on the changes made to Cordova iOS 7.0.0 see Cordova iOS 7.0.0 Blog Post
iOS Build Options
Build Target
You have two Build Target options when generating build scripts with the iOS app builder: Xcode or Xcode CLI.
An Xcode build requires you to open the generated app in Xcode to build the app.
An Xcode CLI build uses the Xcode command line (CLI) tools to build, automatically sign and optionally deploy the app to a device or simulator.
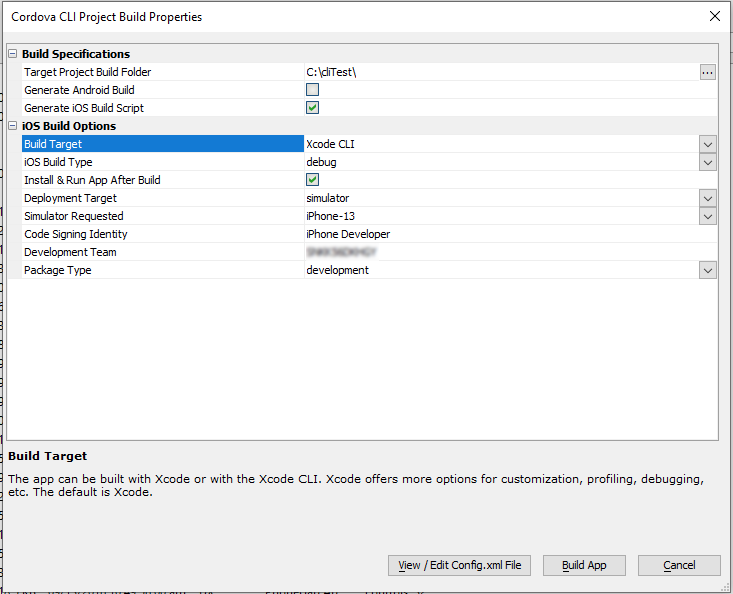
Build Target - Options are Xcode or Xcode CLI. If you would like to use the Xcode CLI tools, you must setup Xcode to automatically manage signing and provisioning. This allows Xcode to create and update profiles, IDs, and certificates. If Xcode CLI is selected, additional options are displayed.
For Xcode CLI builds, the following options will be shown:
iOS Build Type For development, select debug. If you are creating an app for submission to the app store, select release.
Install & Run App After Build - Check this option if you would like to install and run the app on a device or a simulator after the build is complete.
Deployment - If the install and run option is checked, you can optionally deploy the app to a simulator or an iOS device connected your Mac.
Simulator Requested - If you are deploying to a simulator, you can optionally request a specific simulator. Make sure the selected simulator is installed and listed in Xcode.
Code Signing Identity - The default value is iPhone Developer, which is used by convention. This value can be changed as required.
Development Team - This value is listed in the upper right hand corner of the Apple Developer Certificates, Identifiers, and Profiles page. The area is highlighted in red below. Visit https://developer.apple.com to create or sign in to your Apple Developer account.

Package Type - Select development, enterprise, ad-hoc, or app store based on your IPA package type requirements.
Since iOS builds must be done on a Mac with Xcode installed, the Cordova CLI Builder will package all of the required application files into a zip file (all files and subdirectories contained in the Cordova project /www directory) and generate a Bash script (called build.sh) that builds the Cordova project on a Mac. All required plugins will be installed.
Files are generated in the specified project directory using the naming convention: appID_iOS_Files (appID will be replaced with your app ID).
After files are generated, copy them to your Mac in folder where you would like to build the Cordova project. Then, enter bash build.sh from a Terminal window opened within the folder where the files have been copied. The script will build the project within this folder.
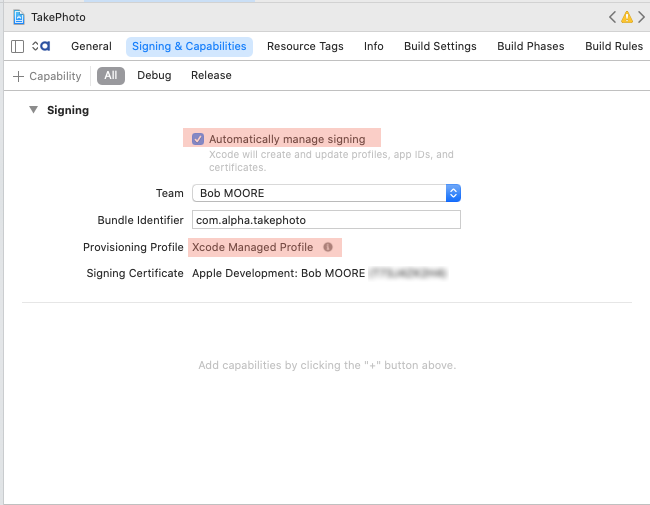
Xcode CLI Builds
If you would like to use the Xcode CLI builds, you must setup at least one Xcode project to use automatic provisioning. Xcode will "remember" this setting and use automatic provisioning for any future Xcode CLI builds. To setup automatic provisioning, open the platforms/ios/appID.xcodeproj with Xcode. In the Signing and Capabilities tab, check Automatically manage signing. Make sure the Provisioning Profile is set to Xcode Managed Profile. Do this for Debug and Release builds. You will now be able to successfully build and install iOS apps using the Xcode CLI tools. This bypasses the requirement to open and build the app in Xcode.
For a video overview on using the Xcode CLI builder, see https://youtu.be/qzngU4SvC74
For Xcode Builds
Once the project files are created, the Xcode project may be opened in Xcode by double clicking the appID.xcodeproj file in the platforms/ios folder (where appID is your app id).
You can now build the project in Xcode and install, run, and test on the iOS simulator or any iOS device provisioned for development on your Mac.
If you have included new plugins, you can either delete the existing Xcode project and run bash build.sh script again, or you can install the plugins with the Cordova CLI command cordova plugins install nameOfPlugin entered from the project root folder in Terminal.
Updating an existing Xcode project - If the Xcode project exists and you have made a change to any of the app files within Alpha Anywhere (such as modifying the base component), run the CLI builder again and copy the zip file over to your Mac. Extract the files into the platforms/ios/www folder, overwriting the existing files. You do not need to run the bash build.sh script a second time unless you have included new plugins.
For More Information
Cordova Android Platform Guide
For more information, review the Cordova Android Platform Guide.
See https://cordova.apache.org/docs/en/latest/guide/platforms/android/
Official Cordova Documentation
For more information on Cordova CLI development, review the official Cordova Documentation.
See https://cordova.apache.org/docs/en/latest/guide/overview/index.html
Videos
Alpha DevCon 2022: Keeping Up With Cordova
2022 Cordova Mobile App Development Presentation by Bob Moore, VP of Mobile Development, Alpha Software, Inc.