TLS/SSL Settings
Description
Options for configuring TLS/SSL support on the Application Server.
Discussion
The Application Server supports TLS/SSL for secure, encrypted transmissions. This support is particularly valuable in e-commerce applications.
The Application Server responds on the port specified on the General tab of the Control Panel. If you use port 81 and enable SSL, your URL would be https://localhost:81. If you run SSL on port 443 instead, you can simplify your URL to https://localhost.
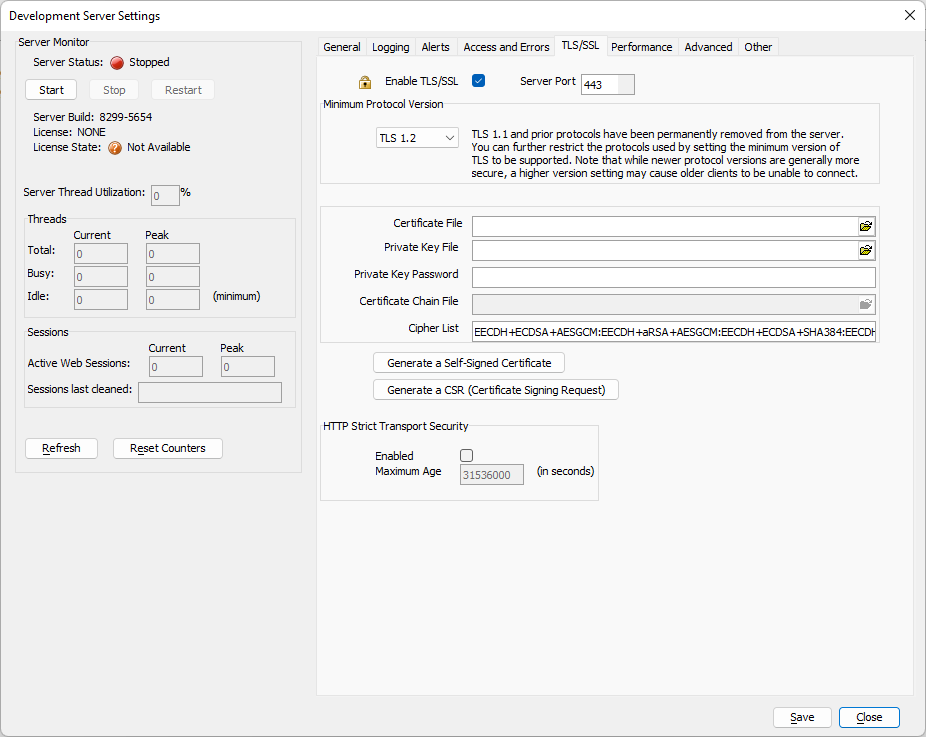
Enable TLS/SSL Settings
- Setting
- Description
- Enable TLS/SSL
Enables or disables TLS (SSL) on the server.
- Server Port
The default SSL port is 443. Any other port will require that you use a URL including the port number (e.g. https://mysite.org:444
Minimum Protocol Version
The minimum TLS protocol version supported by the Classic Application Server can be specified using the Minimum Protocol Version. TLS 1.3 is the most recent protocol and generally considered to be the most secure. Setting the minimum TLS version to 1.3 will disable TLS 1.2 and provide what is currently considered the highest level of security. Note however that not all web browsers or operating systems support TLS 1.3. Site administrators should evaluate the needs of their users before modifying this setting.
The following TLS protocols are available:
- Minimum Protocol
- Description
- TLS 1.2
Default setting. TLS 1.2 may not be supported on older browsers. See https://caniuse.com/#feat=tls1-2 for details on browser compatibility.
- TLS 1.3
Disables TLS 1.2. TLS 1.3 may not be supported in some browsers. See https://caniuse.com/#feat=tls1-3 for details on browser compatibility.
General Settings
- Certificate File
The file containing the TLS (SSL) certificate.
- Private Key File
The private key file that matches the specified TLS (SSL) certificate.
- Private Key Password
The password for the private key file, if required.
- Certificate Chain File
The certificate's chain file, if required or provided by the Certificate Authority. This is sometimes also referred to as the "intermediate certificate", "bundle file", or "intermediate bundle".
- Cipher List
A list of TLS ciphers to use. Leave this blank to use the default cipher list.
- Generate a Self-Signed Certificate
Creates a self-signed certificate for the server. A self-signed certificate is useful for testing intranet applications.
- Generate a CSR (Certificate Signing Request)
Used when requesting a certificate from a Certificate Authority (CA).
- HTTP Strict Transport Security
Configure how HTTP Strict Transport Security is used on the server.
- Enabled
Enable or disable HTTP Strict Transport Security.
- Maximum Age
in seconds.
About TLS (SSL) Certificates
A certificate enables a web server to tell its web clients its name and its public key, to be used for encrypted TLS (SSL) communications. There are two types of certificates.
- Self-signed - good for testing and internal private applications, but not generally suitable for external public applications. Self-signed certificates will generally cause security warnings in web browsers because they are not issued by a well-known and trusted Certificate Authority (CA).
- Commercial - Issued by a well-known and trusted Certificate Authority (CA), such as DigiCert, Sectigo, and Let's Encrypt - good for public applications. Because these certificates are issued by a well-known CA, browsers will trust the secure connection and not prompt with any security warnings.
To get a certificate from a trusted Certificate Authority:
Generate a Certificate Signing Request (CSR) for the server where the certificate will be installed. Be sure to keep the private key created as part of the CSR generation. It will be needed when you receive your certificate.
Send this information to one of the trusted companies. Typically, you will paste it into a web form, but the methods vary.
When you receive your certificate:
Select the Enable SSL checkbox.
Click the
 Browse button to navigate to and select the Certificate File.
Click to navigate to and select the Private Key File.
Enter your password into the Private Key Password control if you set a password during CSR generation.
If your Certificate Authority provided a certificate chain file, click to navigate to and select the Certificate Chain File.