
Building Offline Clt="pable Mobile Applications
Getting Started
NOTE: This feature is still in Beta. To turn on the feature in the pre-release build, you must enter a feature keyPlease email marketing@alphasoftware.com to request the key.
Please include details on your background in development and your use case(s) for offline.
To enter the Feature Key, go to the Tools, Feature Packs menu item when the Web Control Panel has focus.
For an in-depth example of a disconnected application that has rich a mobile interface, watch this video.
IMPORTANT: The features described here are only available in the current pre-release Alpha Anywhere build.
Table of Contents
Introduction
Contrasting the Alpha Anywhere Approach To Disconnected Applications with Other Approaches
Updateable List Controls with Detail Views - Concepts
What is a Detail View?
Write Conflicts
Hierarchical Data
Synchronizing Data
Synchronizing Data in Batches
Transactions
How to Define a List Detail View
Using the List Control - Quick Setup Genie
Using the Detail View - Quick Setup Genie
Detail View Actions
List Detail View Properties
Server-side Events - Defined at the List Level
Resolving Write Conflicts Programmatically - The onWriteConflict Event
Custom Handlers for Synchronization Tasks
Customization Options
Table Properties for List Detail View
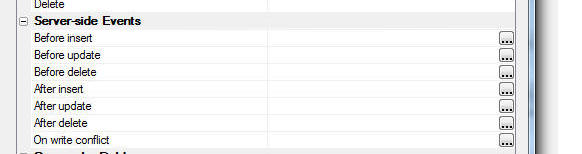
Server-side Events - Defined at the Table Level
Geographic Data
List Search Part
Using the Search Part - Quick Setup Genie
Delay Populate and Custom Data Sources
Setting Search Result Maximums
QBF Syntax
Setting Search Field Properties
Search Part Methods
Persisting Data To Local Storage
Persisting List Data
Persisting Variables
Local Storage Settings
Managing Local Storage
Methods for Managing Local Storage
Client-side Events
Client-side Events for Lists with a Detail View
Client-side Events for Lists with a Search Part
Client-side Events for Lists that Persist Data to Local Storage
Client-side Expressions
Deleting Records
Contrasting Defining Data Binding for a UX with Lists/Detail View
Configuring a List Control for Disconnected Applications
METHODS
UX Component Methods
List Methods - Detail View Part
List Methods - Search Part
Introduction to Offline Applications
The UX component allows you to build applications that work when you are 'disconnected' (i.e. you do not have an internet connection).While you are disconnected, you can continue editing the existing records in your application, you can enter new records, and you can mark records as deleted. When you next have a connection, you click/tap on a 'synchronize' button and the edits that you made while you were disconnected are pushed to the server and the server database is updated. You can also optionally 'pull' records from the server that were edited after your application went 'off-line'.
TIP: It is helpful to think about how an e-mail app on a mobile device operates when trying to understand how the UX component implements disconnected applications. When you use your e-mail app on your phone, your inbox shows a subset of your complete e-mail inbox. You are able to reply to e-mail messages and compose new messages regardless of whether you have a connection or not. When you click the 'send' button, if there is no connection, your replies and new messages are put into the 'out' box and then once a connection is available, the messages in the 'out' box are sent. This all 'just works' - it is completely transparent to the user.
If there are any conflicts or errors when the data are synchronized, errors are displayed in your application, allowing you to fix the data and then resubmit it to synchronize with the server database. Conflict errors (called 'write conflicts') might occur because another user edited a field in a record that you have also edited. Errors might occur because you tried to set a field to a value that was rejected by a server-side validation rule, or by the database server.
The List controls on a UX component are the fundamental building block of disconnected applications. The data in the List control can be thought of as an 'in-memory' database that contains a subset of the master database on the server. Your application will contain functionality to edit, insert and delete data from these Lists (using the List's associated 'Detail View' - see below for more information). At any time, when you have a connection, you can synchronize the edits that you have made to the List data with the server database.
The data in the List controls in a UX are persisted to Local Storage on your device. If your application terminates for any reason (for example, your mobile device runs out of power), the edits that you made are never lost (because they are persisted with the List data in Local storage). When your application is restarted, the Lists are all automatically reloaded from the persisted data, and all form variables are automatically reloaded. When List data is restored from Local Storage, all of the edits that you have made are also restored and you can then synchronize the edits with the server database.
Because form variables are also persisted to Local Storage, a user can be in the middle of filling in a long form when the application terminates unexpectedly and when the application reloads the form is restored to its prior state - preserving all of the user edit.
The data in the List controls (i.e. the 'in-memory' database) can contain a 'flat' list of rows (i.e. a list of customers), or it can contain 'hierarchical' data. For example, the data for the Customer List might also contain data for each order that the customer has placed (stored in the data as a nested array of JSON objects), and for each order, the order details (again, stored in the data as a nested array of JSON objects). In the case where the Customer List is populated with hierarchical data, the List that displays Orders for a given Customer, and the List that displays Order Details for a given Order are considered to be 'child' Lists. These child Lists get their data from the hierarchical data stored in their parent List.
Contrasting the Alpha Anywhere Approach To Offline Access with Other Approaches
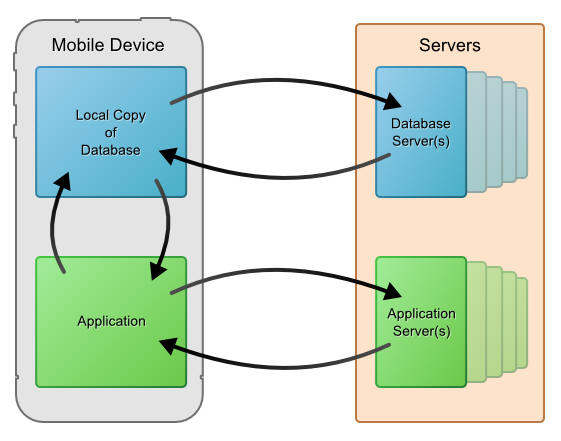
The diagrams below show the basic architecture of the way in which Alpha Anywhere implements disconnected applications and the way many other applications implement disconnected applications.The approach often taken by other applications is to create a replica of a subset of the master database in an 'on-device' database. The 'on-device' database is typically implemented as a native application that runs on the device. The application on the mobile device performs its CRUD (Create, Read, Update, Delete) operations against the local replica database - not against the master database on the server. The local replica database synchronizes with the server database independently of the application. When a replication error occurs, the on-device replica database knows about the error, but the application itself does not. Therefore, special code needs to be added to the application to query the replica database to find out if there were errors and then resolve them. The approach described here cannot be used by HTML5 applications, because HTML5 applications will not be able to talk to the replica database (since this is typically a native application). So the mobile application will have to be a written as a native app, or a hybrid app that uses something like PhoneGap to communicate with the on-device replica database.
"Other" Method
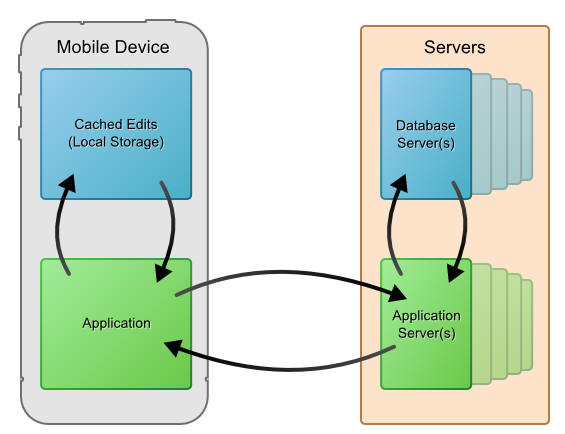
The Alpha Anywhere approach allows you to create pure HTML5 applications that can operate in disconnected mode. That's because the data are persisted to Local Storage which is a standard HTML5 feature. The application caches edits in Local Storage, but when data are synchronized with the server, the communication is between the application and the server database (actually the communication is between the application and the application server, which in turn communicates with the server database). This is exactly how a connected application would operate - which is critically important - because it means that disconnected applications and connected applications essentially work in the same manner. This means that little or no changes have to be make to an application to make it 'disconnected'.
Alpha Anywhere Method
Updateable List Controls with Detail Views - Concepts
The List control, with its associated Detail View, is the fundamental 'building block' of a disconnected application. However Lists with Detail Views are also extremely useful even if your are building a traditional web application and have no immediate need for disconnected functionality.NOTE: A List with an updateable Detail View provides an alterative to Data Binding for performing CRUD operations against a SQL database.
What is a Detail View?
List controls on a UX component can have an associated 'Detail View'. The detail view shows data for the current row in the List.NOTE: A special genie makes setting up a List with a Detail View very easy. The genie allows you to create a List and its associated Detail View all in a single step.There is also another genie (accessed from the Detail View pane of the List builder), that makes setting up a Detail View for an existing List very easy.The image below shows a List with an associated Detail View to the right of the List.
When you select a row in the List, the corresponding Detail View is automatically updated.
If you edit a value in the Detail View and then 'save' the data, the corresponding row in the List is updated and is marked as dirty. Notice in the image below, the small orange triangle in the top right corner of the row to indicate that the data in the List has been edited. Note that at this point, the edits have not been pushed back to the server database (i.e. the database has not yet been 'synchronized').
NOTE: The Customization section in the Detail View pane in the List Builder gives you complete control over the CSS used to display dirty rows. So, if instead of the orange triangle in the top right corner of the row, you would rather use some other style, you can easily do so.

You can continue making as many edits as you want before you synchronize with the server.
For example, the image below shows two rows that were edited (indicated by the orange triangle) and one new row that has been added (indicated by the blue triangle).
When the 'synchronize' button on the UX (not shown in the above image) is clicked, all of the edits are submitted to the server and if there are no errors, the orange and blue indicator icons are removed (because the data in the List rows is no longer 'dirty').
If an error occurred when the was was being synchronized, the indicators on the corresponding List row will indicate that there was an error. For example, in the image below, we have set the value of the Lastname field to a very long value (too long to fit into the corresponding field in the server database). Therefore when we synchronized the data, the server reported an error. The List row now has a red icon (customizable in the List builder settings) indicating that there was a synchronization error on this row.
When the user synchronizes the edits made to a List, a JSON object is send to the server. This object has just the edited rows from each List. For each row in the JSON package sent to the server, the original and updated value for each field is available. If the List is based on SQL data, Alpha Anywhere will generate the SQL CRUD statements automatically. If the List is based on a custom data source (such as a web service), then you will be responsible for writing your own server side synchronization handler.

The actual text of the error is shown in the Detail View when the row with the error is selected:

Write Conflicts
A common problem with database synchronization is write conflicts. A write conflict occurs when some other user updates a record before a user has a chance to synchronize the edits that he/she has made.For example, say that a user did a search to retrieve all customers in Mexico (see image below). Then, the user edited the highlighted record shown below, changing the CompanyName field from 'Antonio Moreno Taqueria' to 'Anthony Moreno Taqueria'. Before this user got a chance to synchronize their edits, another user changed the field to 'Tony Morneo Taqueria'.
When the user eventually tries to synchronize his edits, he will get a write conflict as shown below. The reason for the write conflict is that the current value in the record ('Tony Morneo Taqueria') no longer matches the original value in the record ( 'Antonio Moreno Taqueria'). (The original value in the field is stored in the List when the field is edited, and is submitted to the server when data are synchronized.)
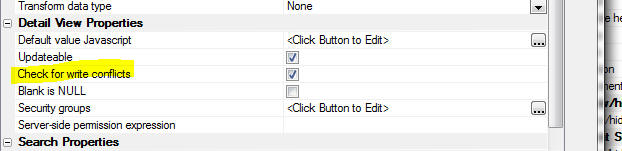
NOTE: You can turn write conflict checking on/off at the individual field level by setting the 'Check for write conflicts' property on the Fields pane in the List builder. If you uncheck this property then the last person to update a field always wins.
The image below shows how the screen would look after the user tried to synchronize his edits and a write conflict occurred.
NOTE: In this section we discuss how the user can resolve write conflicts by making decisions about which value to use. It should be noted that the developer can also 'programmatically' resolve write conflicts by defining an onWriteConflict server-side event handler.Once the write conflict has been reported, the user must then resolve the write conflict. Note that the edited record now has two icons. The orange icon shows that the record is dirty. The red icon shows that there was some type of synchronization error.
When the user taps on the Write conflict message, a pop-down menu appears with options on how to resolve the conflict.
Then menu offers two choices:
If the user selects the 'Use mine' option, the user will be able to tap/click the 'Synchronize' button again to re-submit the edits to the server.
If write conflicts occurred in more than one field, as shown in the image below, then the menu that is shown when the user taps on a field to resolve the write conflict is slightly different. It shows options to resolve all write conflicts in the record using either 'mine' or 'theirs' for all fields in conflict. This allows the user to resolve the conflict in one shot, without having to visit each individual field that had a conflict.
Note how the options in the image below allow the user to resolve all fields with conflicts at once.
The hierarchy of these lists is:
Now consider an application designed for offline (i.e. disconnected usage).
If the user has no connection, it is obviously not possible to make an Ajax callback to fetch the orders for the selected customer when the user clicks on a row in the Customer List.
At the time that the data for the customer records you want to load into your application are fetched, you must also fetch the data for all orders that belong to any customer record that was fetched. Similarly, you must also fetch all OrderDetail records for any Order records that are fetched. The data for the child Lists must be 'pre-fetched' when the data for the top-most parent List in the hierarchy is fetched (the Customer List in this example).
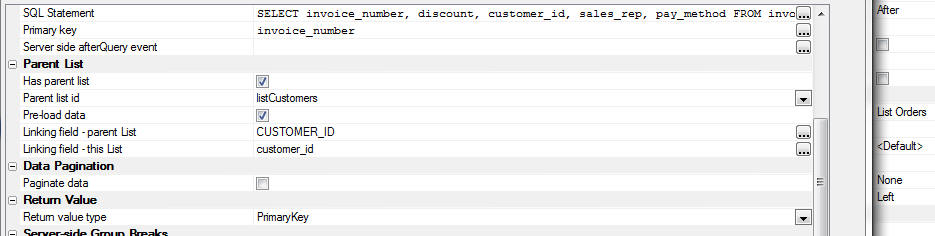
This is easily accomplished in the List Builder. Using the above scenario (Customers ==>Orders ==>OrderDetails), the image below shows the List Builder for the Orders List. Notice that the Has parent list property is checked, the Parent list id property has been set to the id of the List showing the customers, and the Pre-load data property has been checked.
In addition, the fields in the Customer List and the Orders List that link the two Lists have been specified.
Because the data for the child Lists has been pre-fetched, when the user clicks on a row in the Customer List, the Orders List can be populated (with just the orders for the selected customer) without making an Ajax callback. Similarly, when the user clicks on a row in the Orders List, the OrderDetails list can be populated.
The data for the child Lists is actually stored in the top-most parent List. If you examine the JSON representation of the data in a row in the Customer List, you will see that the data looks similar to this:
The text in blue below is the JSON representation of a single row in the Customers List. Notice that the object has a field for each column in the Customers List and it also includes a nested array showing the Orders for that customer. Similarly, the first row in the nested Orders array (order_number "10") has a nested array showing all of the OrderDetails for that order. There is no limit to the depth of this hierarchy of nested Lists.
The data in the Customers List is said to be hierarchical because it contains nested data for all of its child Lists.
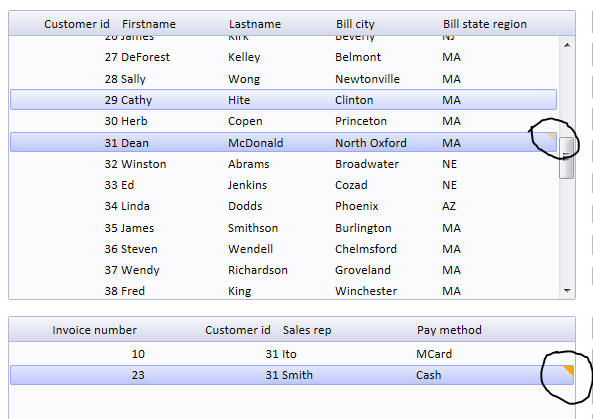
In the screenshot shown below, an edit was made to the 'Sales_rep' field in the Orders List. The row is therefore indicated as dirty by the orange icon on the top right corner of the row. But the record's parent row (customer id 31) has a much lighter icon. This indicates that the row has an 'inherited' dirty status (i.e. one of its children is dirty). If an edit was then made to any field in the row for customer 31, the light orange icon would turn to a standard orange icon (because it is really dirty, not just dirty by inheritance).
Similarly, if the user had pressed the button to synchronize the edits and a server-side validation error was detected for the change made to the (say) the 'Sales-rep' field in the Orders List, the row with the error would have a red icon. But the parent row in the Customer List ('Customer_id' 31) would have a light red icon to indicate that there was an error in one or more of its child Lists.
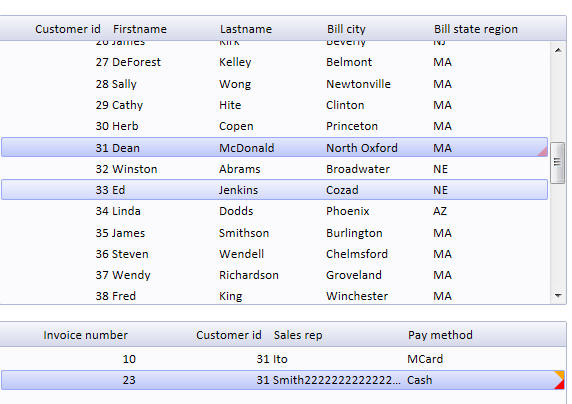
In the screenshot below the value of the 'Sales_rep' field was set to a value that was too big for the database. Therefore a server-side error occurred when the data was synchronized. Notice how the row has a dark red icon indicating that there was a synchronization error and its parent row has a light red icon to indicate that one or more of its child rows has a synchronization error.
When you are working with Lists that contain hierarchical data, the data are synchronized with the server at the top-most parent level. For example if you put a button on the UX to synchronize edits in the 'OrderDetail' List, the UX will automatically traverse up the hierarchy to find the top-most List and the synchronization will be performed on the Customer List (which will automatically synchronize edits in all child Lists).
In this example, a single customer record and all of the nested orders for that customer, and nested OrderDetail for each Order are considered to be a single 'logical' record (even though there might be several physical records represented by this 'logical' record). Synchronization takes place at the logical record level.
When a client-to-server synchronization takes place, a JSON object that contains just the edited rows is sent to the server. If the Lists are based on a SQL data source, then SQL statements are automatically computed in order to update the tables that the Lists being synchronized are based on. If the Lists are not based on a SQL data source, then you will need to write your own synchronization handlers to persist the edits. If it the user has edited a lot of data while disconnected, you can choose to synchronize the data in batches. Server-to-client synchronization takes place when the user clicks a button on the UX to request and incremental refresh of the data in the Lists. An increment refresh differs from a full refresh in that only records that have been edited, or added on the server (since the Lists on the UX were initially populated) are sent to the client (i.e. the mobile device). Any records that were deleted on the server are deleted from the client. You can perform an incremental refresh at any time that you have a connection, but you can only perform a full refresh if there are no unsynchronized edits in the Lists.
When a server-to-client synchronization takes place, the filters that was used when the List was initially populated are honored. For example, assume that at the start of his day, while still at the office where a connection is available, a salesperson enters a search to retrieve all customer records for (say) Lexington, MA (the town in which he will be making sales calls that day). Assume also that the UX has child Lists that display the customer orders and order details The search criteria that the salesperson uses is:
City = 'Lexington' and State = 'MA'
Later in the day, when the salesperson has a good connection, he clicks a button on the UX to perform an incremental refresh. This initiates a server-to-client synchronization and all of the records on the server for customers in Lexington MA that have been edited since the salesperson executed the initial search are sent to the client to update the Lists on the device. Included in the package sent to the client will be all edits made to any orders for the selected customers, or any order details for any order for the selected customers. Stated differently, the Customer List, Orders List and OrderDetail List will all be updated to refresh the edits that have taken place on the server.NOTE: The List Builder allows you to set synchronization policies. You can specify that every time the user saves edits made to the List Detail View, the edits should immediately be synchronized with the server (i.e. a client-to-server synchronization should be performed). You can also specify that every time a client-to-server synchronization is performed that a server-to-client synchronization should be performed. Since a server-to-client synchronization is much more expensive (in terms of server load and bandwidth requirements) than a client-to-server synchronization, you should carefully consider your use case before turning on this option.
You can specify the batch size in the List builder.
If you specify a value greater than 0 for the batch size, you can then specify the name of a Placeholder control where the progress display will be shown and you can also specify other properties, such as whether the user can abort (i.e. cancel sending additional batches after starting the synchronization process).
To understand which CRUD statements get wrapped in transactions, consider the following scenario:
On the server, Alpha Anywhere takes the JSON package and converts it into SQL statements. Here is the sequence of steps on the server:
When you check the 'Has detail view' property, a new Pane in the Builder is shown.
 There are two different genies available for quickly setting up a List with a Detail View.
NOTE: This button will only be visible if you have selected the 'Create a single new control' radio button.
Using the genie, you can configure a List control for disconnected CRUD operations against a SQL database in just a few steps.
The genie even allows you to configure a parent-child relationship between the Lists that you add to the UX. For example, if your UX has a list for the Customer data, when you use the genie to add a List for the Orders data, you can specify that the Orders List is a child of the Customer List.
When you click this button an genie opens:
You can save the settings that you enter into the Genie for reuse in the future. This can make setting up a new List with an associated Detail View and Search Part extremely easy.
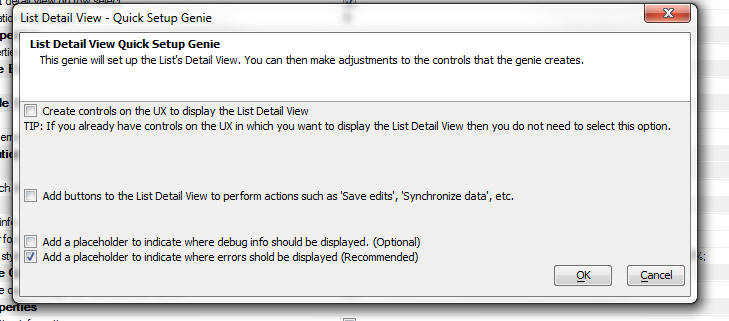
The purpose of the Genie is to automatically add controls to the UX component that will display the Detail View, to bind these controls to the corresponding fields in the List, and to add buttons to the UX for the various Detail View actions (such as Save, Delete, New Record, Synchronize, etc.).
NOTE: This genie differs from the List Quick Setup Genie, which builds a List control (with optional Detail View and Search parts) from scratch.
To use this genie, open the List Builder. Enable the Detail View by checking the Has Detail View property on the List Properties pane. Then go to the Detail View pane and click the Detail View - Quick Setup Genie at the bottom of the screen.
Clicking the genie button opens this dialog:
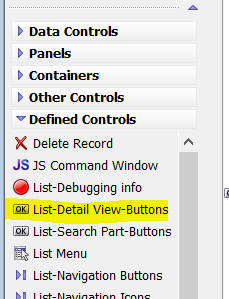
In the 'Defined Control' section of the UX Builder toolbox select the 'List-Detail View-Buttons' item.
This will open a genie that allows you to select the buttons you want for the Detail View:
Each of the buttons you select will invoke a List method when clicked. The corresponding List methods for each of the buttons is shown below. Also shown is the enable expression that is defined for each button if you use the Detail View button genie to create the buttons. The enable expressions ensure that a particular button is only enabled when appropriate. For example, if the List does not have any edits, then it would not be appropriate to enable the 'Synchronize' button.
To turn on the List Detail View, check the 'Has Detail View' property on the 'List Properties' pane.
You can also specify here if the List data should be persisted to Local Storage - needed if you are building a UX that should work when it is disconnected.

Once you have check the 'Has Detail View' property, a new pane is added to the List Builder. The 'Detail View' pane allows you to configure all aspects of the List's Detail View.
This key properties in this dialog are described below:


NOTE: Validation rules can be defined at the individual control level in the UX component builder. The validation rules that you define here are in addition to any rules defined at the control level.
As stated, you can use this event to modify any of the submitted values. For example, if the user did not submit a value for the 'timeLastEdited' field, your event handler can set a value. For example:
if e.data.timeLastEdited = "" then
e.data.timeLastEdited = now()
end if
NOTE: When the data in the List are synchronized, only dirty rows are submitted to the server. So, for example, if a List has (say), 500 rows and 5 rows were edited, then 5 rows of data will be submitted to the server. The Validate event will fire 5 times - once for each row that was submitted.
If your Validate event handler determines that there is some type of validation error, the event handler can set the .hasError flag (see sample function prototype below) and the .errorText property to the validation error message. If the .hasError flag is set to .t., then the row is not synchronized and the error text is displayed to the user.
If you are using the event handler for the purpose of setting values in certain of the fields, you would set thee.data.fieldname property for any field whose value you want to set, and you would ensure that the .hasError property is set to .f.
The function prototype for the event handler is shown below. The properties in the 'e' object passed into the event handler as documented in the function prototype.
function xb_validate as p (e as p)
'This function validates the data that are submitted to the server when a List control is synchronized
'The e object that is passed in includes:
'e.tmpl - component definition
'e.data - data for the current row in the List
'Each item in the array is an Xbasic dot variable with the current and old value of each field in the Detail View.
'For example,
'e.data.CUSTOMER_ID = "1"
'e.data.FIRSTNAME = "Michael"
'e.data.LASTNAME = "Jones"
'e.data.__primaryKey = "1"
'e.data._isNewRow = .f.
'e.data._oldData.CUSTOMER_ID = "1"
'e.data._oldData.FIRSTNAME = "Michael"
'e.data._oldData.LASTNAME = "Harris"
'e.data._isDirty = .T.
'If the code in your script changes a property value, for example:
'e.data.LASTNAME = "Smith"
'then the data saved to the database for the LASTNAME field will be 'Smith' even though the user entered 'Jones'.
'If you change the ._isDirty property to .f. then data in that row will not be saved.
'To abort the action, your function can optionally set these two properties.
'xb_validate.hasError = .t.
'xb_validate.errortext = "Validation error message text"
end function
Server-side error message translate - Error messages returned by the database server can be quite complex and hard for users to understand. This event fires when a server side database error occurs. The event gets passed the error message. Your code in the event handler can look for patterns in the error and translate the error into a friendlier message.
NOTE: If you do not define an event handler to translate the error message, then when an error occurs. a generic error message (which you can customize) is show (e.g. Record was not updated. More...). This error message has a 'more...' link in it so show the full text of the server error.
Shown below is the function prototype for this event handler.
function xb_translate as c (e as p)
'This function is called after a server side error has occurred.
'The e object that is passed in includes:
'e.tmpl - the component definition
'e.errorMessage - the server-side error message
'Your function can modify the value of the e.errorMesage variable.
end function
For example, you (i.e. the developer), might decide that under certain circumstances if a write conflict occurs in a certain field, the server value (or the last submitted value) always wins. Alternatively, you might decide to use a completely different value for the field in conflict.
NOTE: If you want the last submitted value for a certain field to always win, you do not need to do this in theonWriteConflict event. You can simply uncheck the 'Check for write conflicts' property for that field in the Fields pane of the List Builder.
The 'e' object that is passed into the onWriteConflict event handler has information in it about each dirty field in the table. The function prototype for the event handler is shown below, showing details of the properties in the 'e' object passed into the event handler:
TIP: The best way to see what's in the 'e' object is to put a debug(1) statement in the event handler and then run the component in the Live Preview or Working Preview pane in the builder.
function writeconflict as v (e as p)
'This event is called if there are any write conflict error when synchronizing submitted data with the database.
'The e object that is passed in includes:
'e.tmpl - the component definition
'e.data - an array with all of the dirty fields in a row in the List
'each item in the e.data array has properties showing the original value, current value and edited value of the field.
'Your event handler can set this variable to indicate that it has resolved the write conflict (and therefore no write conflict errors will be shown to the user):
'e.resolveConflicts = .t. or .f.
'if e.resolveConflicts is set to .t. then you must set this variable:
'e.resolveConflictMethod = "method" - the options for "method" are:
'"useMine" -- all write conflicts are resolved using the value the user submitted (overwriting the values currently stored in the database)
'"useTheirs" -- the values that are currently in the database are accepted 'as is' and the user is NOT notified that there was a write conflict - the user's changes are lost
'"custom" -- allows you to specify, on a field-by-field basis, how each conflict should be resolved
'if you set e.resolveConflictMethod to "custom" then you MUST specify the 'resolveConflictMethod' for each field in the e.data[] array.
'for example, assume that the e.data[] array that is passed in has 3 items in it (because the user edited 3 field values)
'Your code might do this:
'e.data[1].resolveConflictMethod = "useMine"
'e.data[2].resolveConflictMethod = "useTheirs"
'e.data[3].resolveConflictMethod = "custom"
'e.data[3].customValue = "Value to store"
'Note that for the 3rd field, the method was set to 'custom' and so the value to be stored in the field was supplied using the '.customValue' property.
'Since fields 1 and 2 were resolved using either the 'useMine' or 'useTheirs' option, it was NOT necessary to supply a .customValue property for these fields.
end function
In the case where you have direct access to the SQL database, Alpha Anywhere will automatically generate all of the SQL to perform the CRUD and synchronization operations. There is very little, if any, work that you have to do.
However, in the cases where you need to call web services or stored procedures, Alpha Anywhere allows you to write custom handlers to populate your Lists and synchronization the data in the Lists.
If a List's Data Source property is not set to SQL, the Detail View properties pane in the List Builder will show these options where you can specify the name of the server-side function to call to synchronize the data in the List.

See this component for a full working example. In this example the data are being read from and written back to a text file (using standard file access commands in Xbasic), but the example could just as easily be calling custom web services to perform the CRUD operations.
Synchronization level - This property is only shown if the List has child Lists (i.e. the List contains 'hierarchical' data - each row in the List contains the data for its children embedded in it). The options are TopParentLevel, and EachListInHierarchy. If you specify TopParentLevel then the synchronization function is called once for each 'logical' row. The 'Commit data' event handler will get passed the 'logical' row (parent row and all of its children). If you specify EachListInHierarchy the 'Commit data' event handler will get called for each physical row in the submitted data.
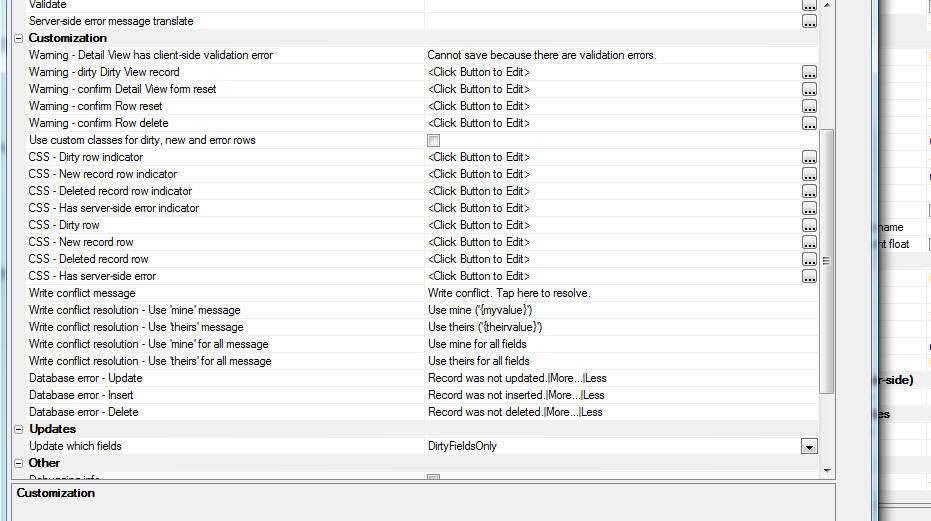
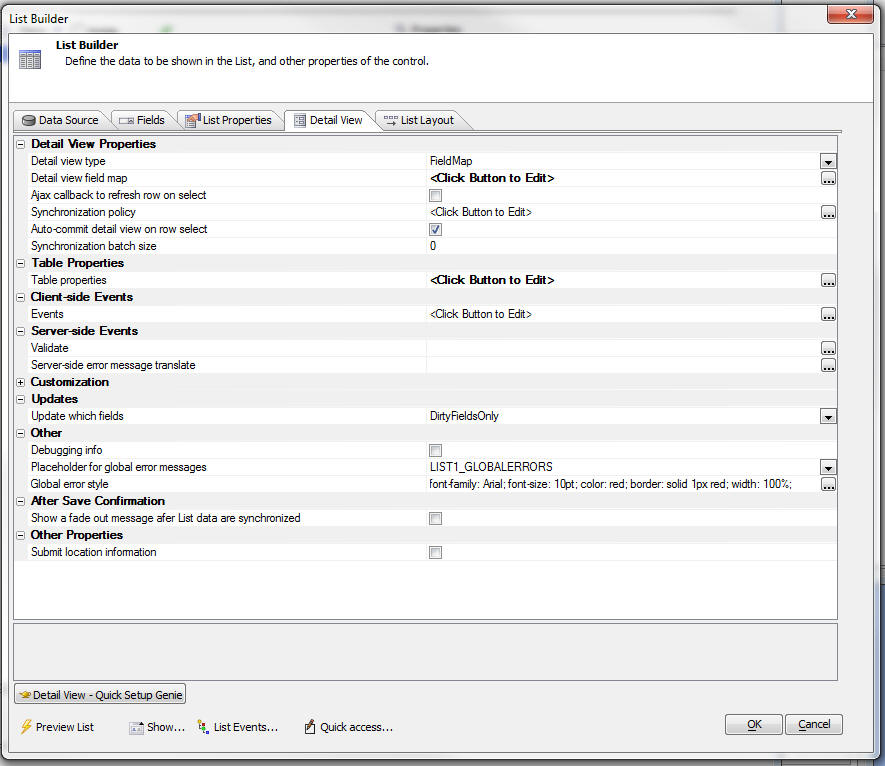
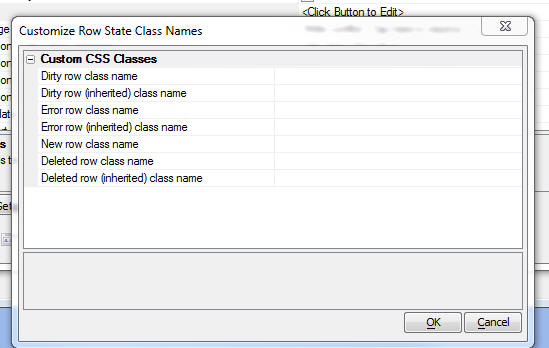
Of particular interest is the Use custom classes for dirty, new and error rows property which allows you to control the visual indication for edited, deleted and inserted rows in the List and the rows that have server-side or write conflict errors.
You can also customize all of the messages shown when errors occur. You can include language tags (<a5:r>..</a5:r>) or text dictionary tags (<a5:t>..</a5:t>) in the customized message strings. Language and text dictionary tags allow you to easily internationalize your application so that text strings are automatically displayed in the user's specified language.
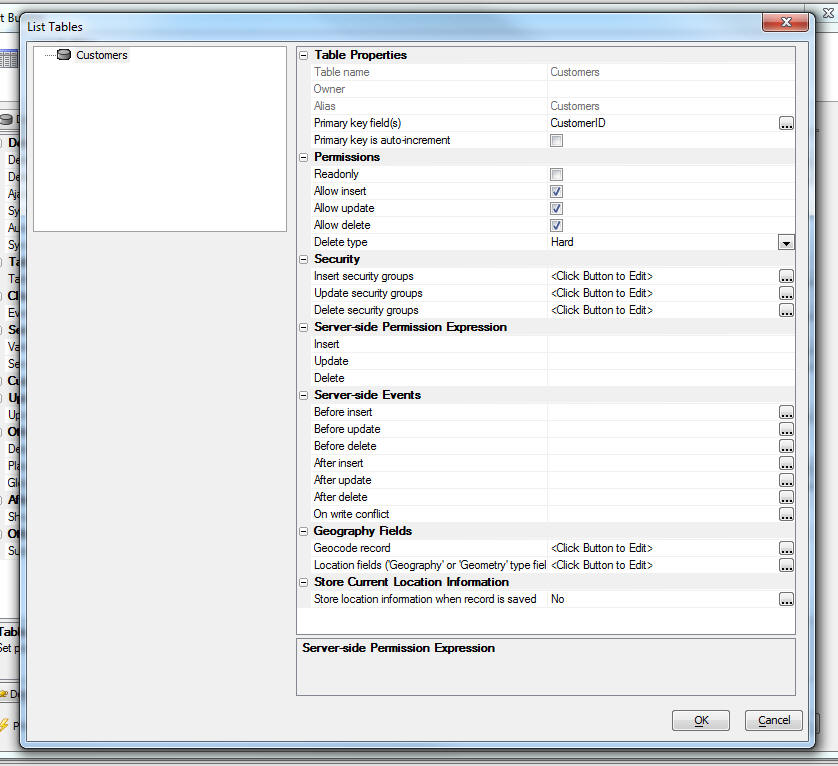
NOTE: The Table Properties property is only present if the List Data Source is set to SQL.
The tree control on the top left shows the tables that are used in the List's SQL statement. If the SQL statement joins multiple tables, the tree will show all of the tables in the join. See below for image.
You can specify if a particular table is readonly. If a table is not readonly, then you can specify individual permission for insert, update and delete actions.
For example, you might specify a server-side permission expression for the Delete operation as follows:
session.var1 = "deleteOK"
When the user tries to delete a record, if this expression does not evaluate to .t. then permission to delete the record will be denied.
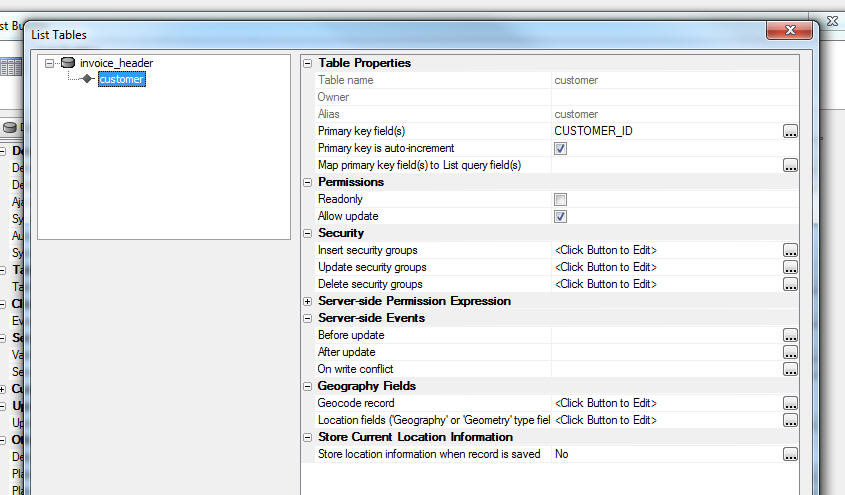
In this next image we show how the Table Properties dialog would appear if the List is based on a SQL statement that joins multiple tables. In this case the Table Properties lists each table in the SQL statement, allowing you to set properties for each table in the join. Note that 'child' tables only allow 'update' CRUD' operations. The properties related to 'insert' and 'delete' CRUD actions are hidden.
Geocode record - Allows you to geocode the record at the time the record is updated or inserted. You can geocode a record if the record contains one or more fields with address information. For example, the record might contain fields called 'address', 'city', 'state' and 'country'. 'Geocoding' means that a latitude and longitude value are looked up for the address specified by the address fields. You can specify the name of the field in the record where the longitude value will be stored and the name of the field where the latitude value will be stored. Alternatively, or in addition, you can also specify that the latitude and longitude values should be encoded in a 'location' field (i.e. a field with a 'geography' or 'geometry' data type - depending on the SQL database type).
NOTE: If you want to perform geography searches (i.e. find all records within 10 miles of my current location), you need to have a 'location' field in the record.
Location fields - If the record has latitude and longitude fields you can specify that these values should be encoded into a 'location' field (i.e. a field with a 'geography' or 'geometry' data type - depending on the SQL database type) when the record is inserted or updated.
NOTE: Typically a user is unlikely to manually enter values into the latitude or longitude fields. A more likely scenario is that your UX component will have a map with a marker that can be dragged. When the user drags the marker, the latitude and longitude fields on the UX are updated, and then when the data are synchronized, the 'location' field is encoded using the update longitude and latitude fields.
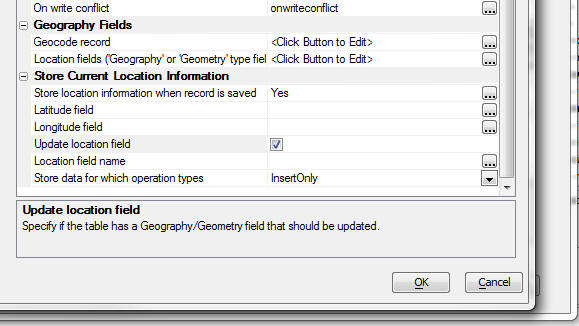
Store location information when record is saved - When the user saves edits made in the List's Detail View, you can save the current location of the device (i.e. its latitude and longitude) in the List data. This information will be obtained from the GPS on the device. Then, when the data in the List are eventually synchronized with the server, the latitude and longitude values that were captured at the time the Detail View edits were saved can be stored in fields in the record that is being updated/inserted. (Do not confuse the term 'saved' here with 'synchronized'. 'Saved' means that edit to the List Detail View were saved back to the List - it does not imply that the data were synchronized with the server - this is a separate action.)
So, for example, the user might have entered 5 records before synchronizing their edits. Each of the 5 records were entered when the user was in a different location. When the data are synchronized, the location at the time each record was entered will be stored in the latitude and longitude fields in the record that is inserted.
You can also specify that the captured longitude and latitude value should be encoded in a location field.
Store data for which operation types - Options for this property are 'InsertOnly' or 'InsertAndUpdate'. You might want to capture the location information only when a new record is first created, but not when it was subsequently edited.
To turn on the List's Search Part, check the Has Search Part property on the List Properties pane in the List Builder.
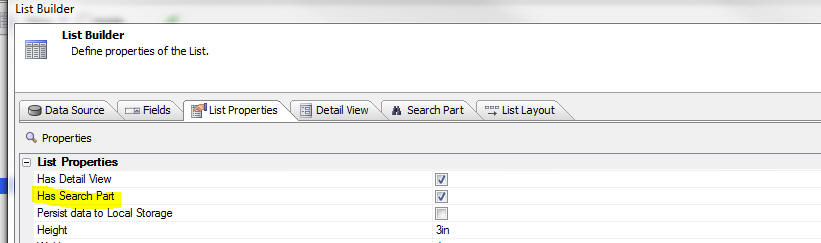
This will add a new pane to the List Builder where you can configure the List's Search Part.
NOTE: A genie is available for quickly adding a Search Part to an existing List. After you have turned on the Search Part by checking the Has Search Part property on the Detail View pane, switch to the Search Part pane (shown above) and then click the Search Part - Quick Setup Genie button at the bottom of the screen.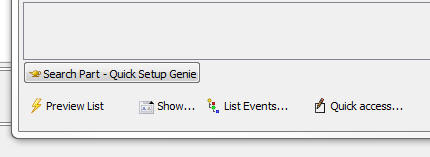
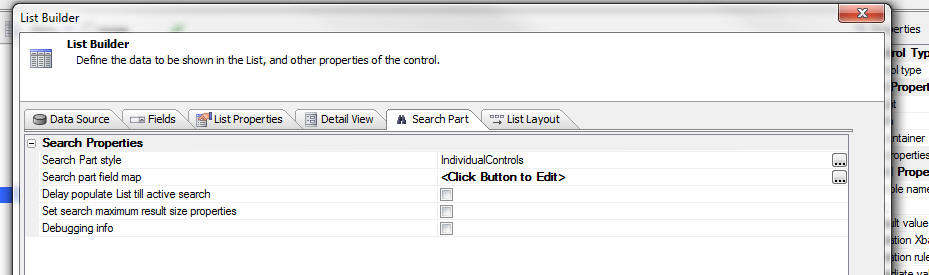
The Search Part can be implemented in three different ways:
Once the data in the List are synchronized, then server-side searching is again allowed.
NOTE: If you are searching in a child List and the parent List is set to pre-fetch data then the search is always client-side.
Other properties of interest on the Search Part Pane include:
Delay populate List till active search - List is not populated with any data until the user has performed a search. This is particularly useful when you are building mobile applications for disconnected use. The following use case indicates how this property is useful:
Say you are building a mobile application for disconnected use. While the user still has a connection (for example. before leaving the office for the day) he/she will enter search criteria in the List's Search Part to retrieve the records that they would like to have while they are disconnected. Since the user will be expected to immediately execute a search after starting the application, there is no point in populating the List initially when the application is started (before the user has had a chance to execute a search) because the records will be immediately discarded when the user executes the search to retrieve the records of interest.
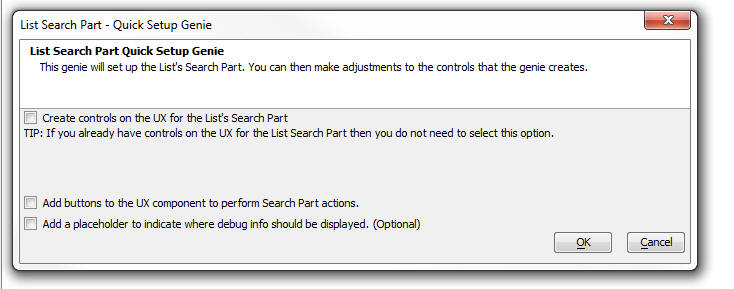
The purpose of the Genie is to automatically add controls to the UX component where the user will enter the search criteria (for the case where the Search Part style is set to IndividualControls or SingleKeywordControl ), bind these controls to the Search Part and to add buttons to the UX for various Search Part actions (such as Search, Clear Search, etc.)
NOTE: This genie differs from the List Quick Setup Genie, which builds a List control (with optional Detail View and Search parts) from scratch.
Clicking the genie button opens this dialog:
(If the Search Part style is set to IndividualControl. The dialog will appear slightly differently for other Search Part styles.)
For example, your custom function might include this code:
if e.delayPopulateTillActiveSearch = .t. then
if e.getDataMode = "populateList" then
if e.flagActiveSearch = "" then
exit function
end if
end if
end if
Set search maximum result size properties - This property allows you to set rule for how many records a search may return, or
NOTE: In this section we discuss how the user can resolve write conflicts by making decisions about which value to use. It should be noted that the developer can also 'programmatically' resolve write conflicts by defining an onWriteConflict server-side event handler.Once the write conflict has been reported, the user must then resolve the write conflict. Note that the edited record now has two icons. The orange icon shows that the record is dirty. The red icon shows that there was some type of synchronization error.
When the user taps on the Write conflict message, a pop-down menu appears with options on how to resolve the conflict.
Then menu offers two choices:
- Use mine
- Use theirs
If the user selects the 'Use mine' option, the user will be able to tap/click the 'Synchronize' button again to re-submit the edits to the server.
If write conflicts occurred in more than one field, as shown in the image below, then the menu that is shown when the user taps on a field to resolve the write conflict is slightly different. It shows options to resolve all write conflicts in the record using either 'mine' or 'theirs' for all fields in conflict. This allows the user to resolve the conflict in one shot, without having to visit each individual field that had a conflict.
Note how the options in the image below allow the user to resolve all fields with conflicts at once.
Hierarchical Data
The List control can contain hierarchical data. For example consider a UX component that has three Lists showing- Customers
- Orders
- OrderDetails
The hierarchy of these lists is:
- Customers
- Orders
- OrderDetails
Now consider an application designed for offline (i.e. disconnected usage).
If the user has no connection, it is obviously not possible to make an Ajax callback to fetch the orders for the selected customer when the user clicks on a row in the Customer List.
At the time that the data for the customer records you want to load into your application are fetched, you must also fetch the data for all orders that belong to any customer record that was fetched. Similarly, you must also fetch all OrderDetail records for any Order records that are fetched. The data for the child Lists must be 'pre-fetched' when the data for the top-most parent List in the hierarchy is fetched (the Customer List in this example).
This is easily accomplished in the List Builder. Using the above scenario (Customers ==>Orders ==>OrderDetails), the image below shows the List Builder for the Orders List. Notice that the Has parent list property is checked, the Parent list id property has been set to the id of the List showing the customers, and the Pre-load data property has been checked.
In addition, the fields in the Customer List and the Orders List that link the two Lists have been specified.
Because the data for the child Lists has been pre-fetched, when the user clicks on a row in the Customer List, the Orders List can be populated (with just the orders for the selected customer) without making an Ajax callback. Similarly, when the user clicks on a row in the Orders List, the OrderDetails list can be populated.
The data for the child Lists is actually stored in the top-most parent List. If you examine the JSON representation of the data in a row in the Customer List, you will see that the data looks similar to this:
The text in blue below is the JSON representation of a single row in the Customers List. Notice that the object has a field for each column in the Customers List and it also includes a nested array showing the Orders for that customer. Similarly, the first row in the nested Orders array (order_number "10") has a nested array showing all of the OrderDetails for that order. There is no limit to the depth of this hierarchy of nested Lists.
The data in the Customers List is said to be hierarchical because it contains nested data for all of its child Lists.
{
    "CUSTOMER_ID": "31",
    "FIRSTNAME": "Dean",
    "LASTNAME": "McDonald",
    "BILL_CITY": "North Oxford",
    "BILL_STATE_REGION": "MA",
    "__primaryKey": "31",
    "__a5crc": -429214,
    "__LIST__LISTORDERS": [
        {
            "order_number": "10",
            "discount": "0",
            "customer_id": "31",
            "sales_rep": "Ito",
            "pay_method": "MCard",
            "__primaryKey": "10",
            "*key": 0,
            "*renderIndex": 0,
            "*value": "10",
"__LIST__LISTORDERDETAILS" : [
{
"part_number" : "P100",
"quantity" : "3"
},
{
"part_number" : "P123",
"quantity" : "13"
}
]
        },
        {
            "order_number": "23",
            "discount": "0",
            "customer_id": "31",
            "sales_rep": "Johnson",
            "pay_method": "Cash",
            "__primaryKey": "23",
            "*key": 1,
            "*renderIndex": 1,
            "*value": "23",
"__LIST__LISTORDERDETAILS" : [
{
"part_number" : "P300",
"quantity" : "43"
}
]
}When you are working with hierarchical Lists, and you make an edit to any of the rows in a child List, the row that was edited is obviously dirty, but the parent row is also considered dirty (because one or more of its children is dirty). This is indicated in the UI by a lighter colored icon. The synchronize button for the parent List will become enabled.
],
"*key": 28,
"*renderIndex": 28,
"*value": "31"
}
In the screenshot shown below, an edit was made to the 'Sales_rep' field in the Orders List. The row is therefore indicated as dirty by the orange icon on the top right corner of the row. But the record's parent row (customer id 31) has a much lighter icon. This indicates that the row has an 'inherited' dirty status (i.e. one of its children is dirty). If an edit was then made to any field in the row for customer 31, the light orange icon would turn to a standard orange icon (because it is really dirty, not just dirty by inheritance).
Similarly, if the user had pressed the button to synchronize the edits and a server-side validation error was detected for the change made to the (say) the 'Sales-rep' field in the Orders List, the row with the error would have a red icon. But the parent row in the Customer List ('Customer_id' 31) would have a light red icon to indicate that there was an error in one or more of its child Lists.
In the screenshot below the value of the 'Sales_rep' field was set to a value that was too big for the database. Therefore a server-side error occurred when the data was synchronized. Notice how the row has a dark red icon indicating that there was a synchronization error and its parent row has a light red icon to indicate that one or more of its child rows has a synchronization error.
When you are working with Lists that contain hierarchical data, the data are synchronized with the server at the top-most parent level. For example if you put a button on the UX to synchronize edits in the 'OrderDetail' List, the UX will automatically traverse up the hierarchy to find the top-most List and the synchronization will be performed on the Customer List (which will automatically synchronize edits in all child Lists).
In this example, a single customer record and all of the nested orders for that customer, and nested OrderDetail for each Order are considered to be a single 'logical' record (even though there might be several physical records represented by this 'logical' record). Synchronization takes place at the logical record level.
Synchronizing Data
Alpha Anywhere defines two types of synchronization:- client-to-server
- server-to-client
When a client-to-server synchronization takes place, a JSON object that contains just the edited rows is sent to the server. If the Lists are based on a SQL data source, then SQL statements are automatically computed in order to update the tables that the Lists being synchronized are based on. If the Lists are not based on a SQL data source, then you will need to write your own synchronization handlers to persist the edits. If it the user has edited a lot of data while disconnected, you can choose to synchronize the data in batches. Server-to-client synchronization takes place when the user clicks a button on the UX to request and incremental refresh of the data in the Lists. An increment refresh differs from a full refresh in that only records that have been edited, or added on the server (since the Lists on the UX were initially populated) are sent to the client (i.e. the mobile device). Any records that were deleted on the server are deleted from the client. You can perform an incremental refresh at any time that you have a connection, but you can only perform a full refresh if there are no unsynchronized edits in the Lists.
When a server-to-client synchronization takes place, the filters that was used when the List was initially populated are honored. For example, assume that at the start of his day, while still at the office where a connection is available, a salesperson enters a search to retrieve all customer records for (say) Lexington, MA (the town in which he will be making sales calls that day). Assume also that the UX has child Lists that display the customer orders and order details The search criteria that the salesperson uses is:
City = 'Lexington' and State = 'MA'
Later in the day, when the salesperson has a good connection, he clicks a button on the UX to perform an incremental refresh. This initiates a server-to-client synchronization and all of the records on the server for customers in Lexington MA that have been edited since the salesperson executed the initial search are sent to the client to update the Lists on the device. Included in the package sent to the client will be all edits made to any orders for the selected customers, or any order details for any order for the selected customers. Stated differently, the Customer List, Orders List and OrderDetail List will all be updated to refresh the edits that have taken place on the server.NOTE: The List Builder allows you to set synchronization policies. You can specify that every time the user saves edits made to the List Detail View, the edits should immediately be synchronized with the server (i.e. a client-to-server synchronization should be performed). You can also specify that every time a client-to-server synchronization is performed that a server-to-client synchronization should be performed. Since a server-to-client synchronization is much more expensive (in terms of server load and bandwidth requirements) than a client-to-server synchronization, you should carefully consider your use case before turning on this option.
Synchronizing Data in Batches
If a user has edited a large number of records while you were disconnected, then when he synchronizes data, you might want to submit the data to the server in batches (say 10 rows at a time). This will allow you to show progress to the user. In additional to showing progress, an abort button will, optionally, also be shown. This will allow a user to stop sending additional batches of data to the server. The abort button will not prevent a batch that has already been sent from being processed on the server.You can specify the batch size in the List builder.
If you specify a value greater than 0 for the batch size, you can then specify the name of a Placeholder control where the progress display will be shown and you can also specify other properties, such as whether the user can abort (i.e. cancel sending additional batches after starting the synchronization process).
Transactions
Alpha Anywhere automatically wraps certain CRUD statements in transactions so that if any statement in the transaction fails, the transaction is rolled back. All updates for a 'logical' record are wrapped in a transaction. A 'logical' record is a parent record and all of its child, grandchild, great-grandchild, etc. records.To understand which CRUD statements get wrapped in transactions, consider the following scenario:
- A UX component has a 'Customer' List and an 'Orders' List which is configured as a 'child' of the customer List. The customer List is configured to 'pre-fetch' the orders data - which means that each record in the customer List has embedded in it all of the orders for that customer.
- Assume that the user edits the customer record for customer 'A1' and also edits one or more of the order records for this customer. For example, say that order 'O1' and 'O2' are edited. When making the edit to order 'O2' assume that the user enters a value in the 'Quantity' field that violates some rule in the database.
- User edits the customer record for customer 'A2' and enters a new order for this customer
On the server, Alpha Anywhere takes the JSON package and converts it into SQL statements. Here is the sequence of steps on the server:
- A new transaction is started because the server is now processing the first 'logical' record (customer 'A1').
- The SQL UPDATE statement for the edit to customer 'A1' is computed and then executed. This statement executes successfully.
- Next, the SQL UPDATE statement for the edit to order 'O1' is computed and then executed. This statement executes successfully.
- Next, the SQL UPDATE statement for the edit to order 'O2' is computed and then executed. This statement fails because the database rejects the value in the Quantity field. As a result of this failure, the transaction is rolled back. This means that the edit to customer 'A1' is undone and the edit to order 'O1' is also undone. At this point, the server is done processing all of the edits to the first 'logical' record.
- Next, and new transaction is started because the server is now processing the second 'logical' record (customer 'A2').
- The SQL UPDATE statement for customer 'A2' is computed and then executed. This statement succeeds.
- Next the SQL INSERT statement for the new order that was entered for customer 'A2' is computed. This statement also succeeds. Note that the SQL INSERT will automatically set the linking field in the record that is created to point to customer 'A2' since this order record is a child of customer 'A2'.
- The transaction is then committed making the edit to customer 'A2' and the entry of the new order for customer 'A2' permanent changes to the database
How to Define a List Detail View
To specify that a List has an associated 'Detail View', check the 'Has detail view' property on the 'List Properties' pane in the List Builder.When you check the 'Has detail view' property, a new Pane in the Builder is shown.
There are two different genies available for quickly setting up a List with a Detail View.- The List Control - Quick Setup Genie can be used when you add a new List control to a UX. This genie quickly create a new List with an optional Detail View part and optional Search Part.
- The Detail View - Quick Setup Genie can be used if you have an existing List control that does not yet have a Detail View part and you want to add a Detail View to the List.
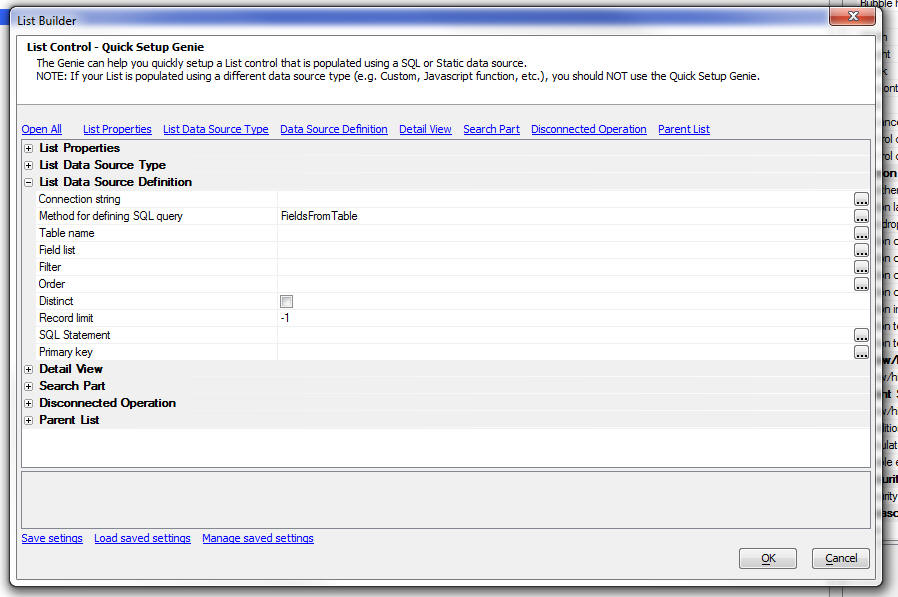
Using the List Control - Quick Setup Genie
When you add a new List control to a UX component, the 'New Control' dialog will have a 'List Control - Quick Setup Genie' button. This genie will allow you to set up a List control, with an optional associated Detail View part and an optional Search Part.NOTE: This button will only be visible if you have selected the 'Create a single new control' radio button.
Using the genie, you can configure a List control for disconnected CRUD operations against a SQL database in just a few steps.
The genie even allows you to configure a parent-child relationship between the Lists that you add to the UX. For example, if your UX has a list for the Customer data, when you use the genie to add a List for the Orders data, you can specify that the Orders List is a child of the Customer List.
When you click this button an genie opens:
You can save the settings that you enter into the Genie for reuse in the future. This can make setting up a new List with an associated Detail View and Search Part extremely easy.
Using the Detail View - Quick Setup Genie
The Detail View - Quick Setup Genie is designed to allow you to add a Detail View to an existing List control that does not currently have a Detail View.The purpose of the Genie is to automatically add controls to the UX component that will display the Detail View, to bind these controls to the corresponding fields in the List, and to add buttons to the UX for the various Detail View actions (such as Save, Delete, New Record, Synchronize, etc.).
NOTE: This genie differs from the List Quick Setup Genie, which builds a List control (with optional Detail View and Search parts) from scratch.
To use this genie, open the List Builder. Enable the Detail View by checking the Has Detail View property on the List Properties pane. Then go to the Detail View pane and click the Detail View - Quick Setup Genie at the bottom of the screen.
Clicking the genie button opens this dialog:
Detail View Actions
The Detail View has a number of associated actions that can be invoked from buttons you add to the Detail View. For examples you would typically add buttons to perform these actions:- Save - save the edits you have made back to the List. (You can optionally set a 'Synchronization preference' in the List builder to indicate that when edits are saved back to the List they should also be synchronized with the server, but by default, the edits are not synchronized).
- Synchronize - synchronize all of the edits that have been made to the List with the server.
- Reset - undo any edits made to the Detail View before they have been saved.
- New Record - add a new record.
- Delete Record - mark the current row in the List as deleted. (The record will only be physically deleted when the data are synchronized. You can specify that deletes should be 'hard' - record is physically deleted, or 'soft' - a field in the record is set to indicate that the record should be considered to be deleted.)
In the 'Defined Control' section of the UX Builder toolbox select the 'List-Detail View-Buttons' item.
This will open a genie that allows you to select the buttons you want for the Detail View:
Each of the buttons you select will invoke a List method when clicked. The corresponding List methods for each of the buttons is shown below. Also shown is the enable expression that is defined for each button if you use the Detail View button genie to create the buttons. The enable expressions ensure that a particular button is only enabled when appropriate. For example, if the List does not have any edits, then it would not be appropriate to enable the 'Synchronize' button.
| Action | Description | Method | Enable Expression for Button |
| Save | Save edits made to the Detail View back to the List. | <listObject>.updateListFromUXControls() | (dialog.listDetailView.SPECIFY_LIST_NAME.isDirty = true) AND (dialog.listDetailView.SPECIFY_LIST_NAME.mode <> 'search') |
| New Record | Start editing a new record. Default values for a new record are filled into the Detail View. | <listObject>.newDetailViewRecord() |
(dialog.listDetailView.SPECIFY_LIST_NAME.isDirty = false) AND (dialog.listDetailView.SPECIFY_LIST_NAME.mode <> 'search') |
| Delete Record | Marks the selected record in the List as deleted. | <listObj>.deleteRow(); |
(dialog.listDetailView.SPECIFY_LIST_NAME.mode <> 'search') |
| Undo Edits | Undo edits made in the Detail View (before the edits have been saved back to the List). | <listObj>.resetForm({prompt: true}) |
(dialog.listDetailView.SPECIFY_LIST_NAME.isDirty = true) AND (dialog.listDetailView.SPECIFY_LIST_NAME.mode <> 'search') |
| Undo Row Edits | Undo the edits made to the selected List row. | <listObj>.resetRow() |
(dialog.listRow.SPECIFY_LIST_NAME.isDirty = true) AND (dialog.listDetailView.SPECIFY_LIST_NAME.mode <> 'search') |
| Synchronize | Pushes all edits made to the List back to the server to synchronize with the server database | {dialog.object}.saveListEdits('SpecifyListName',{rows: 'allRows'}) |
(dialog.list.SPECIFY_LIST_NAME.isDirty = true) AND (dialog.listDetailView.SPECIFY_LIST_NAME.mode <> 'search') |
| Synchronize Current Row | Same as 'Synchronize' but only synchronizes edits in the current row. | {dialog.object}.saveListEdits('SpecifyListName',{rows: 'current'}) | (dialog.list.SPECIFY_LIST_NAME.isDirty = true) AND (dialog.listDetailView.SPECIFY_LIST_NAME.mode <> 'search') |
| Synchronize All | Synchronizes data from ALL Lists on the UX component - user will not have to press Synchronize buttons for each List. | {dialog.object}.synchronizeLists() | (dialog.hasDirtyLists = true) |
| Refresh List Data - Incremental | Performs an 'incremental' refresh of the List data. Server is queried to find records that have been edited since the List was initially populated. Only edited and new records are sent to the browser. This might be a substantially smaller payload than the original payload to populate the List. Rows in the List that have been edited are not updated. | {dialog.object}.refreshListData('SpecifyListName',{mode: 'incremental'})Note: To perform an incremental refresh on all Lists use: {dialog.object}refreshListsIncremental() |
(dialog.listDetailView.SPECIFY_LIST_NAME.mode <> 'search') |
| Refresh List Data | Refreshes all of the data in the List. You can only perform a full refresh is the List is 'clean' (i.e. has no edits that have not yet been synchronized). | {dialog.object}.refreshListData('SpecifyListName'); |
(dialog.list.SPECIFY_LIST_NAME.isDirty = false) AND (dialog.listDetailView.SPECIFY_LIST_NAME.mode <> 'search') |
List Detail View Properties
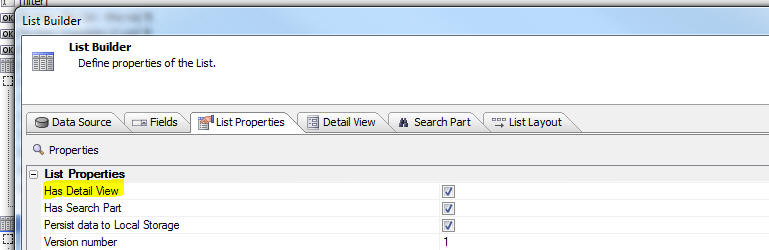
This section describes key properties in the List Builder for configuring the List's Detail View.To turn on the List Detail View, check the 'Has Detail View' property on the 'List Properties' pane.
You can also specify here if the List data should be persisted to Local Storage - needed if you are building a UX that should work when it is disconnected.
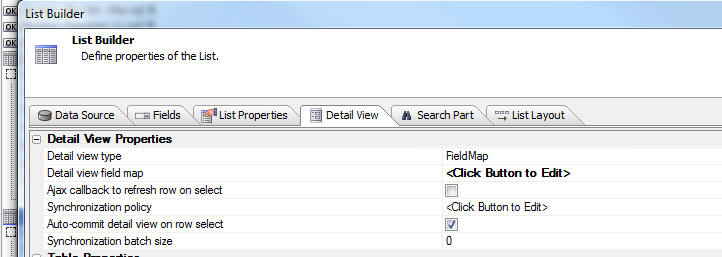
Once you have check the 'Has Detail View' property, a new pane is added to the List Builder. The 'Detail View' pane allows you to configure all aspects of the List's Detail View.
This key properties in this dialog are described below:
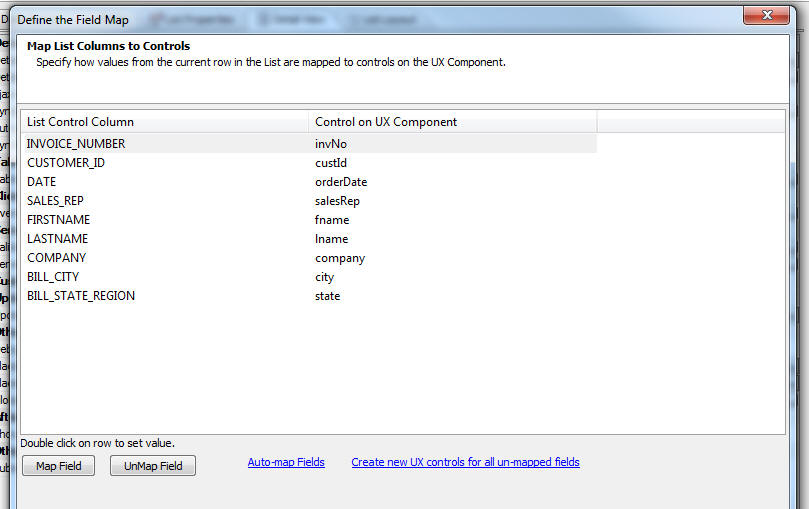
- Detail view type - options are 'FieldMap' and 'Container'. The 'Container' option allows you to specify the name of a container control on the UX. Any controls in the container that have the same name as a column in the List are automatically mapped to the List. So, for example, if the List has a column called 'Lastname' and the container has a control called 'Lastname', the value in the 'Lastname' control will automatically be set to the value in the List row. The 'FieldMap' option requires you to explicitly map controls on the UX to fields in the List.When you open the 'FieldMap' dialog you can map List control columns to controls in the UX by double-clicking on a row in the dialog, or selecting the 'Auto-map' hyperlink to automatically map all controls that have the same name as List columns.A useful feature in the 'FieldMap' dialog is the 'Create new UX controls for all un-mapped fields' hyperlink. Use this button when you find that there is no existing control on the UX to which you can bind a specific List column. All of the controls in the dialog that do not have an explicit mapping will be set to <Create New UX Control>, and then when you close the dialog, new controls will automatically be added to the UX and the field map will be appropriately updated.
- Ajax callback to refresh row on select - By default, when you click on a row in the List, the Detail View is populated using the data that is already in the List. It is not necessary to make an Ajax callback to retrieve any data. However, you can optionally check this property and every time you click on a row in the List, an Ajax callback is made to the server to get the latest data for that row. If you are building an application that must work in disconnected mode, you should not check this property.
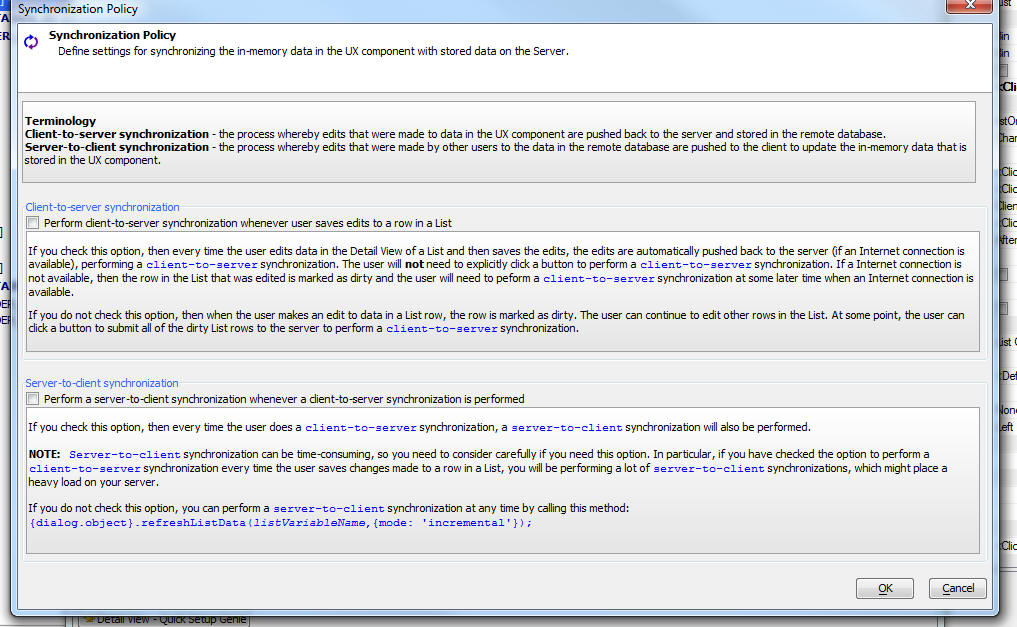
- Synchronization Policy - Allows you to set properties that control when data is synchronized with the server. Two type of synchronization actions are defined: Client-to-server (i.e. synch-push) - this is when edits made on the client (i.e. a mobile device) are 'pushed' to the server to update the server database. Server-to-client (i.e. synch-pull) - this is when edits that were made to the server database (after the data was initially retrieved from the server and stored on the mobile device) are sent to the client to update the stored data.The 'Perform client-to-server synchronization whenever the user saves edits to a row in a List' property allows you to specify that every time the user saves a record in the Detail View the edits should be pushed immediately to the server. If this option is checked, then the List Detail View will behave like a standard web application that immediately executes CRUD operations on the server.The 'Perform a server-to-client synchronization whenever a client-to-server synchronization is performed' property allows you to do a synch-pull every time a synch-push is done. Be cautious about checking this property. Depending on the size of the Lists in your application, checking this application might make your application feel sluggish whenever the user does a synch-push operation. Rather than doing an automatic synch-pull, you might prefer to allow users to manually execute a synch-pull operation using the {dialog.object}refreshListsIncremental() method.
- Auto-commit detail view on row-select - When you have made edits to any field in the Detail View, you cannot give focus to a different row in the List before you have saved your changes. That's because if you do give focus to a different row in the List, any unsaved edits would be lost. Therefore, the List prevents the focus row from changing if there are unsaved edits. If you check this option, then the List will automatically save any edits you have made to the Detail View before the focus row is changed. If a client-side validation error is detected and the Detail View edits cannot be saved, the focus row will not be changed.
- Synchronization batch size - By default, when you synchronize data with the server (to commit any edits that were made on the client to the server database), all of the edited rows in the List are submitted to the server at once. If the user can potentially edit a large number of rows while they are disconnected, you might want to submit the data to the server in batches. If the batch size is set to 0 (the default value), all of the edited data are submitted at once. If you set a value that is greater than 0, additional properties are shown allowing you to set properties of the batch.Background Information - Understanding why Synchronizing in Batches is Important: When data are synchronized, an Ajax callback is made to the server. At this point the client (i.e. the browser) starts to wait for a response from the server, while continuing to execute other tasks (i.e. it does not 'block' while it is waiting for the response). If the response has not been received within a specified time (the setting for Ajax callback timeouts), the callback is considered to have failed and the browser will stop waiting for a response from the server and the onAjaxCallbackFailed client-side event will fire (allowing you to inform the user of the problem).If the reason that the response from the server was not received within the specified timeout interval is simply that a lot of data was submitted to the server and it is taking time for the server to process all of the edits, then the server will successfully complete the task, but its response to the client (telling the client that the data was successfully synchronized and marking the edited rows in the List as 'clean') will never be received by the client. As a result, the next time the user synchronizes edits, the previously submitted data will be submitted again (even though these records have actually been successfully synchronized). So, but setting a non-zero batch size you can ensure that the server will be able to process each batch well within the time allowed by the callback timeout.NOTE When you synchronize data you can dynamically set the batch size with a property set in the .saveListEdits()method. For example: {dialog.object}.saveListEdits('LISTCUSTOMERS',{rows: 'allRows', batchSize: 10});
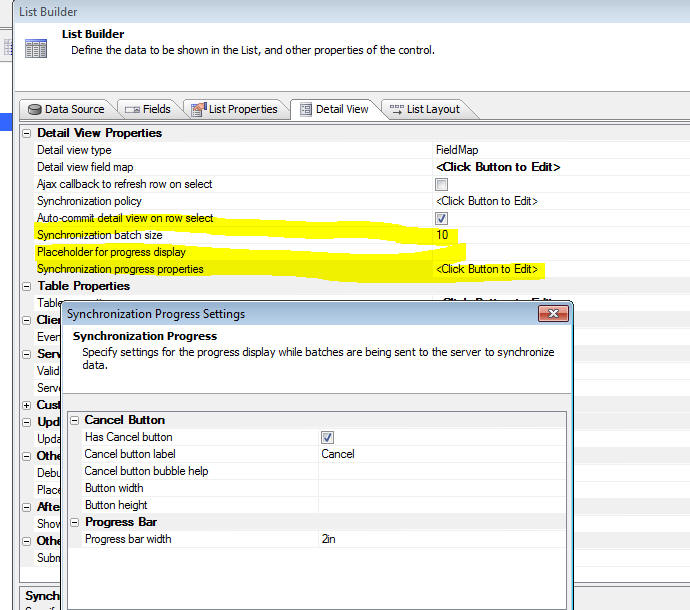
- Placeholder for progress display - Allows you to specify a placeholder where the progress should be displayed. When data are synchronized in batches, a progress control (implemented as a slider) shows how many batches have been synchronized. There are numerous client-side events that fire (see below) that allow you to replace the built-in control with your own control.TIP: To insert a placeholder in the UX, select the [Placeholder] control in the Other Controls section of the UX toolbox on the left of the screen.
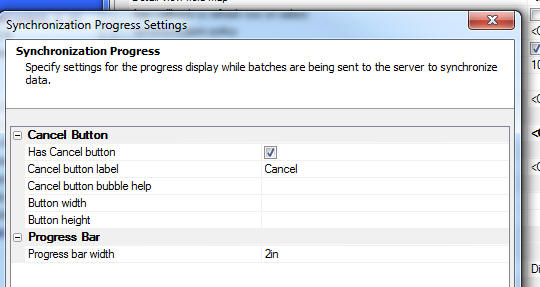
- Synchronization progress properties - Opens a dialog (shown below) that allows you to customize the built-in progress display. You can control whether the user can cancel the operation mid-stream. It is important to note that if the user cancels the operation before all batches have been send, the data in the batch that is currently being processed on the server will still continue to synchronize. All that is achieved by cancelling is that you stop submitting additional batches to the server.

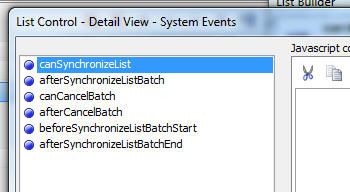
- When data are submitted in batches, a number of client-side events (shown below) are fired. This gives you a great deal of control over the process, including the option to implement your own progress display rather that using the built-in progress control.
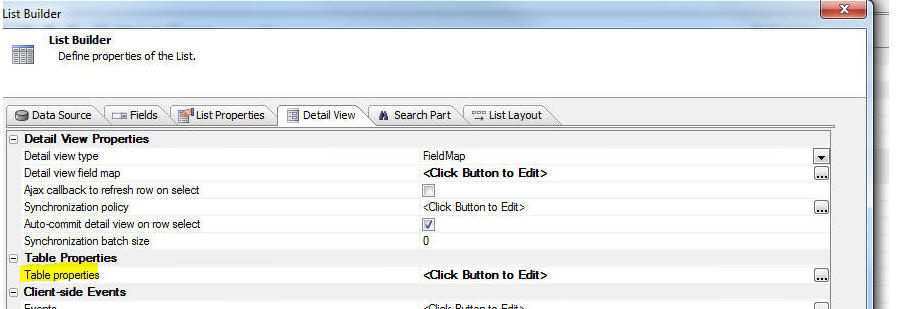
- Table properties - This dialog is allows you to set properties for the table(s) that the List is based on. These properties are used when CRUD operations (Create, Read, Update, Delete) are performed on the List tables.
- Client-side Events - The List exposes a large number of client-side events that are specific to Lists with a Detail View. Click the smart field for the Events property to open a builder for client-side List Detail View events
- Show a fade out message after List data are synchronized - After records have been synchronized, you can display a 'fade-out' message to the user to show confirmation that the records were synchronized.If you have hierarchical Lists (e.g. Customers --> Orders --> OrderDetails), the fade out message is only shown for the top list in the hierarchy (e.g. Customers in this example).You can customize the fade out message by defining an Xbasic function that will compute the fade out message. The Xbasic function gets passed an e object that contains count information about the number of records that were submitted, the number that were updated, insert, deleted and how many records had errors.In the case of hierarchical Lists, the object that is passed to the Xbasic function that computes the custom message includes counts for 'logical' records. For example, say that your List hierarchy is Customers --> Orders --> OrderDetails and the user edits two different OrderDetails records for the same Order. This counts as a single logical record, even though two physical records were submitted and updated.
Server-side Events - Defined at the List Level
Validate - The server-side Validate event is fired once for each submitted row. This event is fired before any SQL statements are computed or executed. The purpose of the event is allow you to define validation rules and to (optionally) modify any of the data that was submitted.NOTE: Validation rules can be defined at the individual control level in the UX component builder. The validation rules that you define here are in addition to any rules defined at the control level.
As stated, you can use this event to modify any of the submitted values. For example, if the user did not submit a value for the 'timeLastEdited' field, your event handler can set a value. For example:
if e.data.timeLastEdited = "" then
e.data.timeLastEdited = now()
end if
NOTE: When the data in the List are synchronized, only dirty rows are submitted to the server. So, for example, if a List has (say), 500 rows and 5 rows were edited, then 5 rows of data will be submitted to the server. The Validate event will fire 5 times - once for each row that was submitted.
If your Validate event handler determines that there is some type of validation error, the event handler can set the .hasError flag (see sample function prototype below) and the .errorText property to the validation error message. If the .hasError flag is set to .t., then the row is not synchronized and the error text is displayed to the user.
If you are using the event handler for the purpose of setting values in certain of the fields, you would set thee.data.fieldname property for any field whose value you want to set, and you would ensure that the .hasError property is set to .f.
The function prototype for the event handler is shown below. The properties in the 'e' object passed into the event handler as documented in the function prototype.
function xb_validate as p (e as p)
'This function validates the data that are submitted to the server when a List control is synchronized
'The e object that is passed in includes:
'e.tmpl - component definition
'e.data - data for the current row in the List
'Each item in the array is an Xbasic dot variable with the current and old value of each field in the Detail View.
'For example,
'e.data.CUSTOMER_ID = "1"
'e.data.FIRSTNAME = "Michael"
'e.data.LASTNAME = "Jones"
'e.data.__primaryKey = "1"
'e.data._isNewRow = .f.
'e.data._oldData.CUSTOMER_ID = "1"
'e.data._oldData.FIRSTNAME = "Michael"
'e.data._oldData.LASTNAME = "Harris"
'e.data._isDirty = .T.
'If the code in your script changes a property value, for example:
'e.data.LASTNAME = "Smith"
'then the data saved to the database for the LASTNAME field will be 'Smith' even though the user entered 'Jones'.
'If you change the ._isDirty property to .f. then data in that row will not be saved.
'To abort the action, your function can optionally set these two properties.
'xb_validate.hasError = .t.
'xb_validate.errortext = "Validation error message text"
end function
Server-side error message translate - Error messages returned by the database server can be quite complex and hard for users to understand. This event fires when a server side database error occurs. The event gets passed the error message. Your code in the event handler can look for patterns in the error and translate the error into a friendlier message.
NOTE: If you do not define an event handler to translate the error message, then when an error occurs. a generic error message (which you can customize) is show (e.g. Record was not updated. More...). This error message has a 'more...' link in it so show the full text of the server error.
Shown below is the function prototype for this event handler.
function xb_translate as c (e as p)
'This function is called after a server side error has occurred.
'The e object that is passed in includes:
'e.tmpl - the component definition
'e.errorMessage - the server-side error message
'Your function can modify the value of the e.errorMesage variable.
end function
Resolving Write Conflicts Programmatically - The onWriteConflict Event
When a record in any table on which the List is based is updated, the possibility exists that a write conflict will occur.When a write conflict occurs, you can specify that a server-side function should be called. The primary purpose of this event is to give the developer an opportunity to resolve certain types of write conflicts programmatically - and thus never bubbling the error up to the user.For example, you (i.e. the developer), might decide that under certain circumstances if a write conflict occurs in a certain field, the server value (or the last submitted value) always wins. Alternatively, you might decide to use a completely different value for the field in conflict.
NOTE: If you want the last submitted value for a certain field to always win, you do not need to do this in theonWriteConflict event. You can simply uncheck the 'Check for write conflicts' property for that field in the Fields pane of the List Builder.
The 'e' object that is passed into the onWriteConflict event handler has information in it about each dirty field in the table. The function prototype for the event handler is shown below, showing details of the properties in the 'e' object passed into the event handler:
TIP: The best way to see what's in the 'e' object is to put a debug(1) statement in the event handler and then run the component in the Live Preview or Working Preview pane in the builder.
function writeconflict as v (e as p)
'This event is called if there are any write conflict error when synchronizing submitted data with the database.
'The e object that is passed in includes:
'e.tmpl - the component definition
'e.data - an array with all of the dirty fields in a row in the List
'each item in the e.data array has properties showing the original value, current value and edited value of the field.
'Your event handler can set this variable to indicate that it has resolved the write conflict (and therefore no write conflict errors will be shown to the user):
'e.resolveConflicts = .t. or .f.
'if e.resolveConflicts is set to .t. then you must set this variable:
'e.resolveConflictMethod = "method" - the options for "method" are:
'"useMine" -- all write conflicts are resolved using the value the user submitted (overwriting the values currently stored in the database)
'"useTheirs" -- the values that are currently in the database are accepted 'as is' and the user is NOT notified that there was a write conflict - the user's changes are lost
'"custom" -- allows you to specify, on a field-by-field basis, how each conflict should be resolved
'if you set e.resolveConflictMethod to "custom" then you MUST specify the 'resolveConflictMethod' for each field in the e.data[] array.
'for example, assume that the e.data[] array that is passed in has 3 items in it (because the user edited 3 field values)
'Your code might do this:
'e.data[1].resolveConflictMethod = "useMine"
'e.data[2].resolveConflictMethod = "useTheirs"
'e.data[3].resolveConflictMethod = "custom"
'e.data[3].customValue = "Value to store"
'Note that for the 3rd field, the method was set to 'custom' and so the value to be stored in the field was supplied using the '.customValue' property.
'Since fields 1 and 2 were resolved using either the 'useMine' or 'useTheirs' option, it was NOT necessary to supply a .customValue property for these fields.
end function
Custom Handlers for Synchronization Tasks
In many cases the data for the Lists in your UX component will come from SQL databases that you can connect to directly. But in other cases you will need to call stored procedures or web services to perform CRUD operations against your data store.In the case where you have direct access to the SQL database, Alpha Anywhere will automatically generate all of the SQL to perform the CRUD and synchronization operations. There is very little, if any, work that you have to do.
However, in the cases where you need to call web services or stored procedures, Alpha Anywhere allows you to write custom handlers to populate your Lists and synchronization the data in the Lists.
If a List's Data Source property is not set to SQL, the Detail View properties pane in the List Builder will show these options where you can specify the name of the server-side function to call to synchronize the data in the List.
See this component for a full working example. In this example the data are being read from and written back to a text file (using standard file access commands in Xbasic), but the example could just as easily be calling custom web services to perform the CRUD operations.
Synchronization level - This property is only shown if the List has child Lists (i.e. the List contains 'hierarchical' data - each row in the List contains the data for its children embedded in it). The options are TopParentLevel, and EachListInHierarchy. If you specify TopParentLevel then the synchronization function is called once for each 'logical' row. The 'Commit data' event handler will get passed the 'logical' row (parent row and all of its children). If you specify EachListInHierarchy the 'Commit data' event handler will get called for each physical row in the submitted data.
Customization Options
There are numerous places in the List where feedback or messages are display to the user. The Customization section of the Detail View pane in the List Builder exposes these options.Of particular interest is the Use custom classes for dirty, new and error rows property which allows you to control the visual indication for edited, deleted and inserted rows in the List and the rows that have server-side or write conflict errors.
You can also customize all of the messages shown when errors occur. You can include language tags (<a5:r>..</a5:r>) or text dictionary tags (<a5:t>..</a5:t>) in the customized message strings. Language and text dictionary tags allow you to easily internationalize your application so that text strings are automatically displayed in the user's specified language.
Table Properties for List Detail View
When you click the Table Properties smart field in the Detail View pane in the List Builder, the List Tables dialog is shown. This dialog allows you to set all of the properties relating to the CRUD operations that are performed on the List's tables.NOTE: The Table Properties property is only present if the List Data Source is set to SQL.
The tree control on the top left shows the tables that are used in the List's SQL statement. If the SQL statement joins multiple tables, the tree will show all of the tables in the join. See below for image.
You can specify if a particular table is readonly. If a table is not readonly, then you can specify individual permission for insert, update and delete actions.
- Delete type - This property allows you to specify what action should be taken when a user deletes a record. The options are 'Hard' and 'Soft'. A 'hard' delete will physically delete a record (by executing a SQL DELETE statement. However, if your SQL database uses foreign keys, DELETE operations can often fail if you are trying to delete a record that has linked records (for example, you cannot delete a customer record if there are are order records that point to the customer you want to delete). The 'soft' delete, on the other hand, does not do a physical delete. It simply sets the value in a 'delete' field, which you specify.
The List automatically applies a filter to exclude records that have the 'delete' field set to true, so the records that have been 'soft' deleted will automatically be excluded from the List.
For example, you might specify a server-side permission expression for the Delete operation as follows:
session.var1 = "deleteOK"
When the user tries to delete a record, if this expression does not evaluate to .t. then permission to delete the record will be denied.
In this next image we show how the Table Properties dialog would appear if the List is based on a SQL statement that joins multiple tables. In this case the Table Properties lists each table in the SQL statement, allowing you to set properties for each table in the join. Note that 'child' tables only allow 'update' CRUD' operations. The properties related to 'insert' and 'delete' CRUD actions are hidden.
Server-side Events - Defined at the Table Level
When performing CRUD operations on the table(s) in a List, a rich set of server-side events are available.- Before insert - Fires before a record is inserted into a table (i.e. before a SQL INSERT statement is executed). The 'e' object that is passed into the function contains the SQL statement that is about to be executed and the arguments that will be passed to the statement. You code can modify these values. Your code can also choose to abort the operation by setting thee.abort flag. A full description of the properties passed in with the 'e' object is available if you click the smart field for this property.
- Before update - Fires before a record is updated (i.e. before a SQL UPDATE statement is executed). See comments for Before insert.
- Before delete - Fires before a record is deleted (i.e. before a SQL DELETE statement is executed - in the case where the delete type is set to 'hard', or a SQL UPDATE statement is executed - in the case where the delete type is set to 'soft').
- After insert - Fires after a new record has been inserted into a table. The 'e' object that is passed into the function hase.primaryKeyValue, the primary key of the record that was inserted (useful if the primary key is an auto-increment value). Click the smart field for this property to see a full description of the properties passed in with the 'e' object.
- After update - Fires after a record has been updated.
- After delete - Fires after a record has been deleted.
- On write conflict - Fires if there was a write conflict when executing an Update operation. This event allows you to handle write conflict synchronization errors programmatically, rather than bubbling the errors back to the user for him/her to resolve.
Geographic Data
The Table Properties allows you to set certain properties that pertain to geographic data.Geocode record - Allows you to geocode the record at the time the record is updated or inserted. You can geocode a record if the record contains one or more fields with address information. For example, the record might contain fields called 'address', 'city', 'state' and 'country'. 'Geocoding' means that a latitude and longitude value are looked up for the address specified by the address fields. You can specify the name of the field in the record where the longitude value will be stored and the name of the field where the latitude value will be stored. Alternatively, or in addition, you can also specify that the latitude and longitude values should be encoded in a 'location' field (i.e. a field with a 'geography' or 'geometry' data type - depending on the SQL database type).
NOTE: If you want to perform geography searches (i.e. find all records within 10 miles of my current location), you need to have a 'location' field in the record.
Location fields - If the record has latitude and longitude fields you can specify that these values should be encoded into a 'location' field (i.e. a field with a 'geography' or 'geometry' data type - depending on the SQL database type) when the record is inserted or updated.
NOTE: Typically a user is unlikely to manually enter values into the latitude or longitude fields. A more likely scenario is that your UX component will have a map with a marker that can be dragged. When the user drags the marker, the latitude and longitude fields on the UX are updated, and then when the data are synchronized, the 'location' field is encoded using the update longitude and latitude fields.
Store location information when record is saved - When the user saves edits made in the List's Detail View, you can save the current location of the device (i.e. its latitude and longitude) in the List data. This information will be obtained from the GPS on the device. Then, when the data in the List are eventually synchronized with the server, the latitude and longitude values that were captured at the time the Detail View edits were saved can be stored in fields in the record that is being updated/inserted. (Do not confuse the term 'saved' here with 'synchronized'. 'Saved' means that edit to the List Detail View were saved back to the List - it does not imply that the data were synchronized with the server - this is a separate action.)
So, for example, the user might have entered 5 records before synchronizing their edits. Each of the 5 records were entered when the user was in a different location. When the data are synchronized, the location at the time each record was entered will be stored in the latitude and longitude fields in the record that is inserted.
You can also specify that the captured longitude and latitude value should be encoded in a location field.
Store data for which operation types - Options for this property are 'InsertOnly' or 'InsertAndUpdate'. You might want to capture the location information only when a new record is first created, but not when it was subsequently edited.
List Search Part
The List can have an integrated Search Part for filtering the records shown in the List.To turn on the List's Search Part, check the Has Search Part property on the List Properties pane in the List Builder.
This will add a new pane to the List Builder where you can configure the List's Search Part.
NOTE: A genie is available for quickly adding a Search Part to an existing List. After you have turned on the Search Part by checking the Has Search Part property on the Detail View pane, switch to the Search Part pane (shown above) and then click the Search Part - Quick Setup Genie button at the bottom of the screen.
The Search Part can be implemented in three different ways:
- IndividualControls - You specify a separate set of controls on the UX where the user will enter search criteria. For each field in the List that you want to be able to search in, an individual search control would be added to the List. For example, the List might have these fields: CustomerId, Firstname, Lastname, City, State, Zip. You might want to let the user search for data in the Firstname and Lastname fields. Therefore you would add search controls for Firstname and Lastname.
- SingleKeywordControl - You create a single control in which the user will enter search criteria. You specify in which fields in the List will be searched. A match if found if any of the specified field matches the search criteria.
- QueryByForm - This option is only available if the List has a Detail View. The Detail View controls also server as the Search Part control. The List can be set into a 'search' state and then search criteria can be entered into the Detail View controls. See the .searchModeOn() and .searchModeOff() methods below for information on how to toggle the search mode on and off. The List can actually be in three different states: 'search', 'edit' (editing an existing record) and 'enter' (entering a new record).
Once the data in the List are synchronized, then server-side searching is again allowed.
NOTE: If you are searching in a child List and the parent List is set to pre-fetch data then the search is always client-side.
Other properties of interest on the Search Part Pane include:
Delay populate List till active search - List is not populated with any data until the user has performed a search. This is particularly useful when you are building mobile applications for disconnected use. The following use case indicates how this property is useful:
Say you are building a mobile application for disconnected use. While the user still has a connection (for example. before leaving the office for the day) he/she will enter search criteria in the List's Search Part to retrieve the records that they would like to have while they are disconnected. Since the user will be expected to immediately execute a search after starting the application, there is no point in populating the List initially when the application is started (before the user has had a chance to execute a search) because the records will be immediately discarded when the user executes the search to retrieve the records of interest.
Using the Search Part - Quick Setup Genie
The Search Part - Quick Setup Genie is designed to allow you to add a Search Part to an existing List control that does not currently have a Search Part.The purpose of the Genie is to automatically add controls to the UX component where the user will enter the search criteria (for the case where the Search Part style is set to IndividualControls or SingleKeywordControl ), bind these controls to the Search Part and to add buttons to the UX for various Search Part actions (such as Search, Clear Search, etc.)
NOTE: This genie differs from the List Quick Setup Genie, which builds a List control (with optional Detail View and Search parts) from scratch.
Clicking the genie button opens this dialog:
(If the Search Part style is set to IndividualControl. The dialog will appear slightly differently for other Search Part styles.)
Delay Populate and Custom Data Sources
If the List is populated using a Custom data source and you have checked the delay populate property you must add the necessary code to your custom function to test if there is an active search. The 'e' object that is passed into your custom function will have the necessary properties for you to test in your code.For example, your custom function might include this code:
if e.delayPopulateTillActiveSearch = .t. then
if e.getDataMode = "populateList" then
if e.flagActiveSearch = "" then
exit function
end if
end if
end if
Set search maximum result size properties - This property allows you to set rule for how many records a search may return, or
Setting Search Result Maximums
In a mobile application you that is designed for disconnected use, the data in List control represents the 'disconnected' data (i.e. the subset of the master database that the user will have available to them on the mobile device. The typical design pattern is to specify that the List should not be populated with any records until the user has performed a search to retrieve the sub-set of records that they want to use when they are disconnected.The 'Set search maximum result size properties' property allows you to define rules for the search.
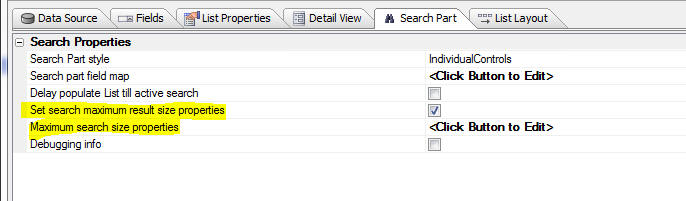
The rules allows you to set properties to guard against the situation where the user performs a search that is not sufficiently restrictive and returns too large a subset of the master database. You would want to prevent this from happening because it would result in an excessively long time to download the search result to the mobile device, or would download more data that can fit into memory or storage in the browser on the mobile device.
You can specify the maximum search result in two ways:
IMPORTANT Even if the user performs a search that satisfies the rules specified here, there is still a chance that the data will fail to load successfully into the List after it has been downloaded to the client (i.e. the browser). That's because, if you have specified that the List data should be persisted to Local Storage, there may not be enough free space in Local Storage to store the data. In this case the client-side onSearchResultTooLargeForLocalStorage event will fire allowing you to instruct the user to enter a more restrictive search, or to try to free space in Local Storage.
comma, .., >, >=, <, <=
Examples
boston,london,paris - Search for 'boston', 'london' or 'paris' in the field.
boston.. - search for values greater or equal to 'boston'
234.. - search for values greater or equal to 234
>=234 - search for values greater or equal to 234
123..456 - search for values between 123 and 456 (inclusive)
123..456,689..900 - search for values between 123 and 456 or between 689 and 900
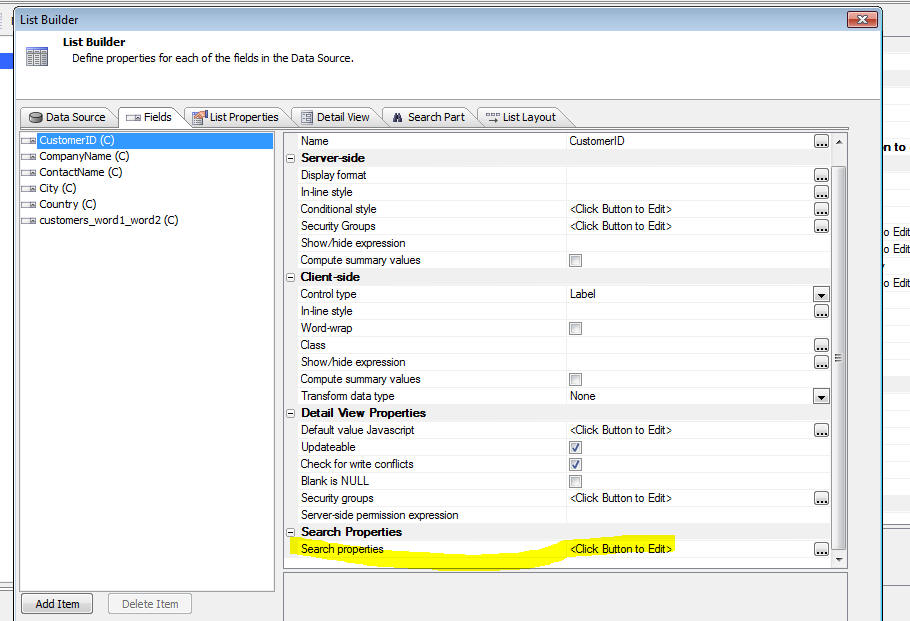
Clicking this button displays this dialog:

The search option property brings up a list of search options:
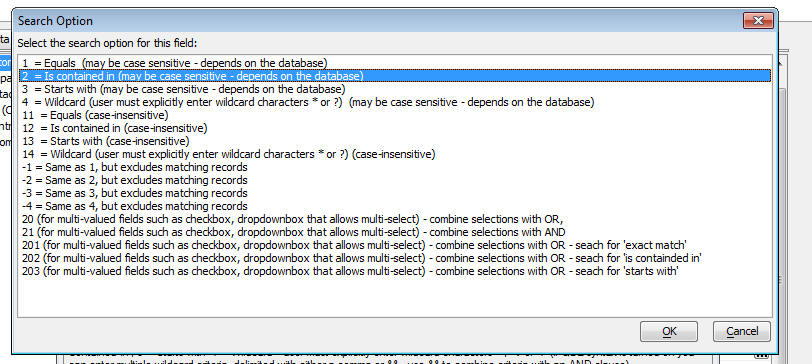
NOTE: For client-side searches, only options 1, 2, 3, -1, -2 and -3 are currently implemented.
For List controls, you control whether the data in the List is persisted to Local Storage by setting a property in the List builder for the List:
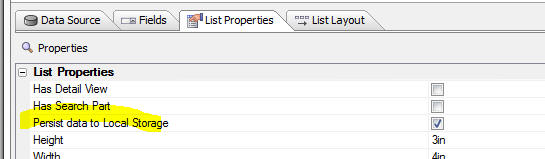
You can also manually trigger the event by calling the UX component's{dialog.object}.persistVariablesToLocalStorage() method.
When variables are persisted to Local Storage various client-side events are fired.
The onBeforePersistControlValuesToLocalStorage event fires first. This event fires before the variables are persisted. Its purpose is to allow you to specify any additional data that you want to persist along with the variable values. Your code can set the e.userData property. The value you set in this property will be available when theonRestoreVariablesFromLocalStorage fires.
The localStorageEncryption event fires next. The event allows you to add your own encrypting to the JSON data that is about to be stored to Local Storage. The event handler gets the JSON data in the e.data property and the event handler can set e.data to the encrypted string.
When the component is loaded if the 'Restore variables from Local Storage' setting is trueThe onRestoreVariablesFromLocalStorage event will fire after the data has been restored. This event handler can access the e.userData property which was optionally defined when theonBeforePersistControlValuesToLocalStorage event was fired.
If the 'Restore variables from Local Storage' property is set of false, you can still manually restore persisted variables by calling the UX component's {dialog.object}._restoreVariablesFromLocalStorage() method.
You can add a pre-defined control to your UX to manage Local Storage. This control is primarily intended for use by developers while they are designing the application. It is not ideal for the users of your application.
To insert the 'Local Storage Manager' into your component, select the control from the 'Defined Controls' section in the UX toolbox.
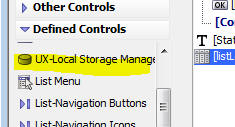
This will insert a List control into the component that will allow you to see all of the keys in Local Storage, the keys for this component (i.e. app), all keys (excluding keys for this app), etc. You can see how much space each key is consuming and you can peek at the data in the key. You can also delete keys.The rules allows you to set properties to guard against the situation where the user performs a search that is not sufficiently restrictive and returns too large a subset of the master database. You would want to prevent this from happening because it would result in an excessively long time to download the search result to the mobile device, or would download more data that can fit into memory or storage in the browser on the mobile device.
You can specify the maximum search result in two ways:
- number of rows - the maximum number of rows that a search can return. (In the case of hierarchical data - i.e. a List that has child, grandchild, great-grandchild Lists, etc. the row count refers to rows in the top-most parent List).
- payload size - the maximum size in bytes of the data in the search result. This is the data that would be sent to the browser to populate the List. This is typically the more important setting as a large number of rows that have a very short record length would not result in a large payload and might not result in excessive download times or memory usage
IMPORTANT Even if the user performs a search that satisfies the rules specified here, there is still a chance that the data will fail to load successfully into the List after it has been downloaded to the client (i.e. the browser). That's because, if you have specified that the List data should be persisted to Local Storage, there may not be enough free space in Local Storage to store the data. In this case the client-side onSearchResultTooLargeForLocalStorage event will fire allowing you to instruct the user to enter a more restrictive search, or to try to free space in Local Storage.
QBF Syntax
When you enter search criteria, you can optionally use a special QBF syntax (if you have configured the search field to allow QBF syntax -The QBF syntax operators are:comma, .., >, >=, <, <=
Examples
boston,london,paris - Search for 'boston', 'london' or 'paris' in the field.
boston.. - search for values greater or equal to 'boston'
234.. - search for values greater or equal to 234
>=234 - search for values greater or equal to 234
123..456 - search for values between 123 and 456 (inclusive)
123..456,689..900 - search for values between 123 and 456 or between 689 and 900
Setting Search Field Properties
In the List builder, on the Fields pane, click the smart field for the 'Search properties' property to configure the search properties for each field.Clicking this button displays this dialog:
The search option property brings up a list of search options:
NOTE: For client-side searches, only options 1, 2, 3, -1, -2 and -3 are currently implemented.
Search Part Methods
Persisting Data To Local Storage
The UX component can persist three different types of data to Local Storage- List data
- UX component variables
- UX component state (not currently implemented)
Persisting List Data
Each List that you add to a UX component has its own settings for controlling if the List data should be persisted. If the data in a List is static (i.e. is never changed while the application is running), then there is no need to persist the data.For List controls, you control whether the data in the List is persisted to Local Storage by setting a property in the List builder for the List:
Persisting Variables
Variables are persisted whenever a 'trigger' event occurs. For some controls (e.g. Radiobutton,. Checkbox, Slider, etc.), the 'trigger' is when the value in the control is changed. For textbox and textarea controls, the 'trigger' is when the control is blurred (i.e. loses focus) and the value in the field has changed.You can also manually trigger the event by calling the UX component's{dialog.object}.persistVariablesToLocalStorage() method.
When variables are persisted to Local Storage various client-side events are fired.
The onBeforePersistControlValuesToLocalStorage event fires first. This event fires before the variables are persisted. Its purpose is to allow you to specify any additional data that you want to persist along with the variable values. Your code can set the e.userData property. The value you set in this property will be available when theonRestoreVariablesFromLocalStorage fires.
The localStorageEncryption event fires next. The event allows you to add your own encrypting to the JSON data that is about to be stored to Local Storage. The event handler gets the JSON data in the e.data property and the event handler can set e.data to the encrypted string.
When the component is loaded if the 'Restore variables from Local Storage' setting is trueThe onRestoreVariablesFromLocalStorage event will fire after the data has been restored. This event handler can access the e.userData property which was optionally defined when theonBeforePersistControlValuesToLocalStorage event was fired.
If the 'Restore variables from Local Storage' property is set of false, you can still manually restore persisted variables by calling the UX component's {dialog.object}._restoreVariablesFromLocalStorage() method.
Local Storage Settings
You can control what gets persisted to Local Storage by setting properties in the UX component as shown below.- Namespace - In order to manage the keys in Local Storage, you specify a 'namespace'. All keys for this component will use the namespace as a prefix. If you specify <Default> or leave the namespace blank, a system generated namespace will be used. In addition to the namespace specified here, all keys will also include 'ALPHA_' in the namespace. This allows for easy identification of keys in Local Storage that are tied to any UX application. For example, if you set the 'namespace' property to 'orderApp', the key that stores the data for a List called 'Orders' will be 'ALPHA_orderAPP.LIST.ORDERS'.You can specify an optional 'friendly name' and 'description' for the namespace. The friendly name, description, version and a datestamp are automatically persisted to a key called 'ALPHA_namespace._INFO' any time any UX data are persisted to Local Storage.
- Persist variable values - Check this property to persist to Local Storage the value of all variables on the UX. (A 'variable' is associated with each data entry control on the UX. For example, a textbox, radiobutton, checkbox, slider, etc. all have an associated 'variable' that contains the current 'value' for the control.)
- Persist component state - (Not currently implemented) Stores in Local Storage information such as what Panel in a Panel Navigator currently has focus, what Panels in a Panel Layout are currently visible, etc.
- Working Preview testing mode - When you are in Working Preview you can specify that the local file system on your computer should be used for storing data that would otherwise be put in the browser's Local Storage. The benefit of this is to allow you to easily see what's being stored in Local Storage because you can simply examine the contents of the files in the specified folder on your computer
- Restore variables from Local Storage - If this property is checked, then when the component is re-loaded, any variable whose value was persisted to Local Storage will be restored.
- Restore data in List controls from Local Storage - If this property is checked the data in the List controls are restored when the component is reloaded. (Only the Lists that you indicated should be persisted to Local Storage are restored. Each List has its own setting to indicate if it is persistable. See below for more information.)
Managing Local Storage
Local Storage is a shared resource and it is limited. The exact limitation is a function of your device. In order to free up storage space for an application on a device, it might be necessary to delete storage being used by some other application that you are no longer using.You can add a pre-defined control to your UX to manage Local Storage. This control is primarily intended for use by developers while they are designing the application. It is not ideal for the users of your application.
To insert the 'Local Storage Manager' into your component, select the control from the 'Defined Controls' section in the UX toolbox.
The image below is showing the keys in Local Storage for an component where the 'Namespace' property has been set to 'app1'
If you tap on the Show button you can see up to the first 1,000 bytes of data in the key:
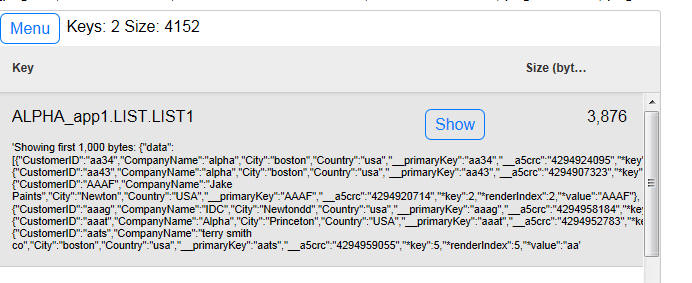
Methods for Managing Local Storage
The UX component has several methods that make it easy for developers to add functionality to their components to manage the data in Local Storage.NOTE: These methods cannot be used in Working Preview if you have configured your component to use the file system for Local Storage.
The {dialog.object}._ls_getData() function returns an object with information about the keys stored in Local Storage. The method takes a flag to indicate which keys in Local Storage to return information on.
The object that is returned has these properties
- data - an array with information about each key found. The array has an object for each key found. The object has a key andsize property indicating the key name of the item and the size in bytes of the item.
- size - the total size in bytes of all keys found
- keyCount - the number of keys that were found.
//pass in the 'a' flag to get info on All keys
var obj = {dialog.object}._ls_getData('a')
console.log('Number of keys: ' + obj.keyCount);
console.log('Number of bytes: ' + obj.size);
var data = JSON.stringify(obj.data);
console.log('Data: ' + data);
The following flags can be used:
| Flag | Meaning |
| a | All keys in Local Storage |
| aa | All keys created by UX components. Keys that are added to Local Storage all have 'ALPHA_' as a prefix. Only keys that have this prefix are returned. |
| t | All keys for this UX component. These keys all start with 'ALPHA_' followed by the namespace for the component (e.g. ALPHA_NS1). NOTE: The namespace for the component is specified in the UX component properties - Local Storage section. |
| o | All other keys (i.e.excluding keys for this UX component). (Same as using the 'a' flag, then removing keys returned for the 't' flag). |
| oa | All UX component keys, but excluding keys for this component. (Same as using the 'aa' flag, then removing keys returned for the 't' flag). |
| v:t | Key used to persist variables for this UX component. NOTE: The UX component allows you to specify that variables in a component should be persisted to Local Storage (See Local Storage section in UX properties). |
| v:a | All UX component keys that store persisted variables (for any UX component, not just this component). |
| v:o | All UX components keys that store persisted variables, excluding this UX component (Same as using 'va' and then removing 'vt'). |
| lists:t | All of the List components in this component that are persisted to Local Storage. NOTE: Not every List in a UX component is persisted to Local Storage. Each List in a UX has its own setting (defined in the List Builder) to control whether it is persisted. |
| lists:a | All of the List components (from any UX component) that are persisted to Local Storage. |
| lists:o | All of the List components, excluding the Lists in this component. (Same as using 'lists:a' and then removing 'lists:t') |
Once you have retried the array of information using the {dialog.object}._ls_getData() method, you might want to delete the keys listed in the array. You can pass in the object returned by the {dialog.object}._ls_getData() method to the {dialog.object}._ls_deleteKeys() method.
For example:
//delete all keys in local storage for other UX components
var obj = {dialog.object}._ls_getData('o');
{dialog.object}._ls_deleteKeys(obj);
Namepsace Information Key
Each UX component that persists data to Local Storage automatically stores a key in Local Storage with information about the UX component every time the UX component persists data to Local Storage.
The special key is name:
ALPHA_<your component namespace>._INFO
The data in the key contains these properties:
- lastUsed - the last date that information for this namespace was written to Local Storage. This will allow you to write routines that delete keys for infrequently used applications.
- friendlyName - the component 'friendly name' - specified in the UX builder - Local Storage section.
- description - the component 'description' - specified in the UX builder - Local Storage section.
- version - the component 'version' - specified in the UX builder - Local Storage section.
{
"lastUsed": "2014-07-26T14:27:41.122Z",
"friendlyName": "Expense Reporting",
"description": "An application to capture expenses.",
"version": 1
}
Client-side Events
Client-side Events for Lists with a Detail View
If a List has a Detail View, there are a large number of client-side events that are exposed.To define these client-side events, click the smart field for the Events property (on the Detail View pane in the List Builder) to open a builder for client-side List Detail View events.
The builder shows all of the client-side events for Lists with Detail Views.
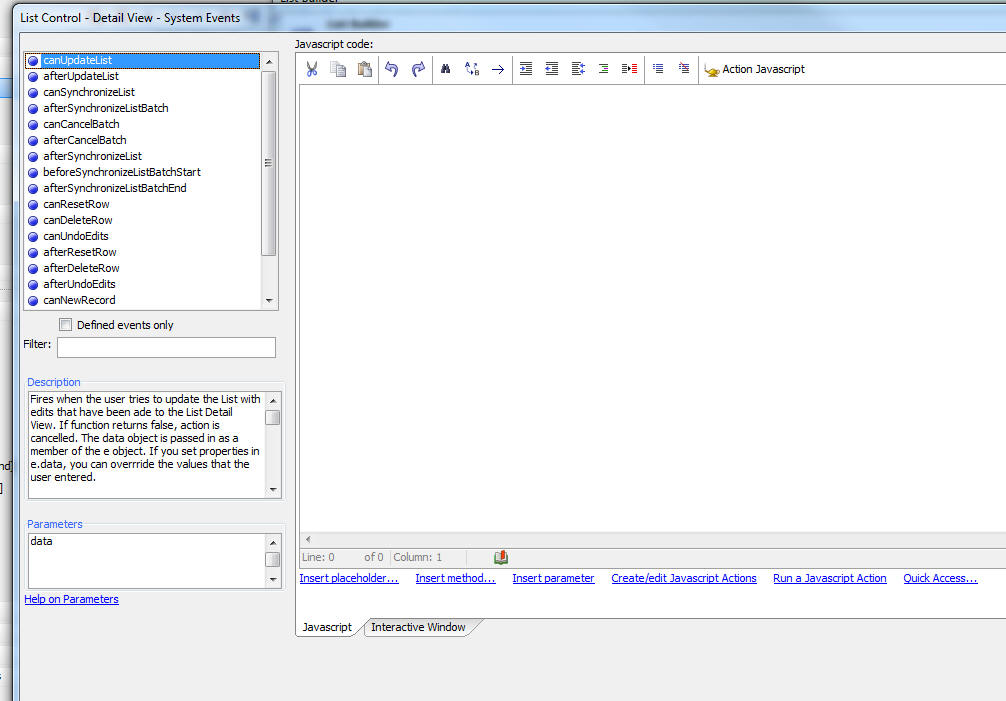
The key client-side events are summarized below:
- canUpdateList - Fires when the user tries to update the List with edits that have been ade to the List Detail View. If function returns false, action is cancelled. The data object is passed in as a member of the e object. If you set properties in e.data, you can overrride the values that the user entered.
- canSynchronizeList - Fires when the user tries to synchronize the data in the List (by making an Ajax callback). If function returns false, action is cancelled. The data object is passed in as a member of the e object. If you set properties in e.data, you can override the values from the List that will be submitted to the server. You can prevent the data in a particular row in the List from being synchronized by setting the ._isDirty property of the row data to false. For example to prevent the data in row 2 (zero based) from being synchronized, use this code:e.data[2]._isDirty = false;The data passed into the e object includes batchSize, totalDirtyRows and startingRow. If all data is not being submitted in batches, batchSize is 0. To test if this is the first batch in a job test for batchSize > 0 and startingRow =
- afterSynchronizeList - Fires after the data in the List has been synchronized. Data passed into the event handler includes: hasErrors, recordsWithErrors, recordsSubmitted, recordsUpdate, recordsInserted, recordsDeleted, recordsWithServerSideValidationErrors, recordsWithWriteConflictErrors, recordsWithDatabaseErrors,l istId
- afterRefreshListIncremental - Fires after an incremental refresh is performed on a List (to retrieve records from the server that were added/updated/deleted after the List control was initially populated). Data passed into the event handler includes: rowsUpdated, rowsInserted, rowsDeleted,l istId.
- canResetRow - Fires when the user tries to undo edits to a row of data in the List. If function returns false, action is cancelled.
- canUndoEdits - Fires when the user tries to undo edits to the List Detail View form. If function returns false, action is cancelled.
- afterResetRow - Fires after the user has undone edits to a row of data in the List.
- afterUndoEdits - Fires after the user has undone edits to the List Detail View.
- canNewRecord - Fires when the user tries to go to a new Detail View record. If function returns false, action is cancelled.
- afterNewRecord - Fires after the new record has been displayed in the DetailView form
- afterListRowSelectCancelled - Fires when user tries to select a new row in a List and the action is cancelled because the Detail View for the current List, or any child List, is dirty. If your event handler sets e.handled = true, the system message will be suppressed. A typical use for this event is to give focus to the dirty Detail View. For example, say you have hierarchical data with customers, orders and orderDetails. If the user has edited the Detail View for the orderDetail list and then clicks on a different row in the customer List, the action will be cancelled and this event will fire. If the Detail View for the orderDetail List is in another Panel, this event can give focus to the Panel so that the user can save the dirty Detail View record.
- afterSynchronizeListBatch - If the List is being synchronized in batches, fires when a batch is completed. If the function returns false, the next batch (if any) will not be sent. The data in the e object that is passed in will allow you to create your own progress counter. The e object includes these properties: totalDirtyRows, batchSize, startingRow and pctComplete. NOTE: If you want to execute code at the start of the batched job, see the canListSynchronize event.
- beforeSynchronizeListBatchStart - If the List is being synchronized in batches, fires before the first batch is send to the server.
- afterSynchronizeListBatchEnd - If the List is being synchronized in batches, fires after the last batch in the job has completed.
- canCancelBatch - If the List is being synchronized in batches, fires if the user clicks the 'Cancel' button to stop sending batches of records to the server to synchronize. If the function returns false, then the synchronization is not cancelled.
- afterCancelBatch - If the List is being synchronized in batches, fires after the user has clicked the 'Cancel' button to stop sending batches of records to the server to synchronize.
- modeChanged - Fires when the List mode changes. Modes are 'enter', 'edit' and 'search'. 'search' applies only if the List has a Search Part and the Search Part is set to QueryByForm mode
Client-side Events for Lists with a Search Part
The following client-side events are specific to Lists with a Search Part. These events are defined on the 'List Properties' pane in the List builder (by clicking the 'More events...' property)- afterSearchComplete - Fires after the user submits the List's Search Part to execute a search of the records in the List. The 'searchMode' parameter is either 'search ' or 'clear' - user cleared existing Search Part filter. 'searchWhere' indicates where the search will be performed. It is either 'clientSide', or 'serverSide'
- beforeSearch - Fires before the user submits the List's Search Part to execute a search of the records in the List. The 'searchMode' parameter is either 'search ' or 'clear' - user cleared existing Search Part filter. 'searchWhere' indicates where the search will be performed. It is either 'clientside', or 'serverside'. The 'listIsDirty' property indicates if the List is dirty (has unsynchronized edits). If the 'listIsDirty' property is true and the 'searchWhere' property is true, you can display a message telling the user that server-side searches are not permitted. If your event returns false, the system error message will then be suppressed.
- onSearchResultTooLarge - Typically used in mobile applications when you want to ensure that the user is not trying to retrieve too much data from the server. Fires if the user executes a server-side search that returns too many records. Allows you to display UI telling the user to enter more restrictive search criteria. The maximum allowed search size is set in the List builder, but can be overwritten by properties set in the <listObject>.searchList() method.
- onSearchResultTooLargeForLocalStorage - If the List is set to persist to Local Storage this event will fire if the user peformed a server-side search that retrieved more records than could be stored in Local Storage. You can use this event to instruct the user to enter more restictive search criteria.
Client-side Events for Lists that Persist Data to Local Storage
The following client-side events are specific to Lists that have been set to store their data to Local Storage. These events are defined on the 'List Properties' pane in the List builder (by clicking the 'More events...' property)- onBeforePersistToLocalStorage - Fires before the List is persisted to Local Storage. You can optionally set the e.userData property to any object and the data in e.userData will be persisted along with the List data.
- onPersistToLocalStorage - Fires after the List is persisted to Local Storage. The 'success' parameter (logical value - true/false) indicates if the data was successfully saved to Local Storage, or not. The 'mode' parameter indicates what List action (e.g. 'populate', 'append', 'udate', etc.) triggered the event.
- onRestoreFromLocalStorage - Fires after the List data has been restored from Local Storage. The e.userData property contains any data that was set in the onBeforePersistToLocalStorage event.
Client-side Expressions
There are several system fields that can be used in client-side expressions (show/hide, enable, etc.) For exampledialog.listDetailView.LIST1.mode = 'enter'
The 'mode' system field can be 'enter', 'edit' or 'search'.
In the above example, 'LIST1' is the name (i.e. variablename) for the List.
Other system fields specific to Lists with a Detail View or Search Part are:
| Name | Description |
| dialog.listDetailView.SPECIFY_LIST_NAME.isDirty | Indicates whether any field in the List's Detail View has been edited. After the edits in the current List row are saved back to the List, this flag will be reset to false. |
| dialog.listRow.SPECIFY_LIST_NAME.isDirty | Indicates if the current row in the List has been edited. This flag is set to true after edits in a Detail View have been saved back to the List. |
| dialog.list.SPECIFY_LIST_NAME.isDirty | Indicates if any row in the List has been edited. When this flag is true, it indicates that the List has data that needs to be synchronized. |
| dialog.hasDirtyLists | Indicates if the UX component has any Lists that have been edited. When this flag is true, it indicates that the UX has one or more Lists with data that needs to be synchronized. |
| dialog.listDetailView.SPECIFY_LIST_NAME.mode | Indicates the Detail View mode. Can be 'enter' - entering a new record, 'edit' - editing an existing record, or 'search' - (Only applies if the List has a Search Part which has been configured as 'Query by Form') indicates that the Detail View is being used to enter search criteria rather than editing field values. |
Deleting Records
When records are delete in a List's Detail View, the record is initially simply marked as deleted. It is not physically deleted until the List is synchronized. At any time before the List is synchronized you can undelete the record by calling the List object's.resetRow() method.Two types of 'deletes' are supported - 'hard' and 'soft'. A 'hard' delete will physically delete the record from the database. A 'soft' delete will simply set the value is a special field to 1 to indicate that the record has been 'deleted' (actually it would be more accurate to say that the record has been 'marked as deleted').
When you configure the Table Properties for the Detail View, you can specify if you want to perform 'hard' or 'soft' deletes.
A common use case for 'soft' deletes is when working with a tables that have relationships. For example consider a database that has tables for 'customers', 'orders' and 'orderDetails'. If you attempt to delete a customer record without first deleting all orders for that customer, the delete will fail (assuming the database has been configured with foreign keys). Rather than having to worry about implementing logic to first delete all customer orders, it is simpler to just set a flag field in the customer record.
When the List is displayed, it will automatically filter our records that have been marked as deleted.
Contrasting Defining Data Binding for a UX with Lists/Detail View
Prior to this version of Alpha Anywhere, when you wanted to perform CRUD (create, read, update, delete) operations on a SQL database you would typically set the Data Binding properties of the UX (as shown in the image below).Setting the Data Binding properties for a UX involved specifying which table or tables the UX was 'bound' to, and then mapping control on the UX to fields in the bound tables.
Having done that you would then define a Save Submitted Data to Table(s) action in the UX's AfterDialogValidate server-side event. (See image below). You would also (optionally) define a Load Primary Keys for Parent Table action in theonDialogInitialize event.
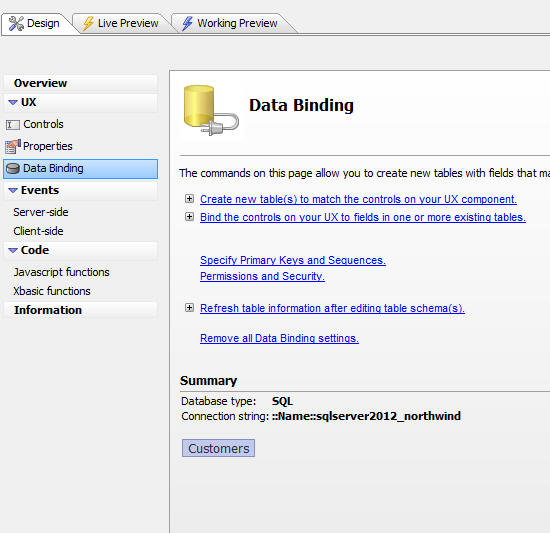

Alternatively, you could use Action Javascript actions to perform CRUD operations on 'unbound' tables. These action (shown below) can be thought of as using 'ad-hoc' data binding.
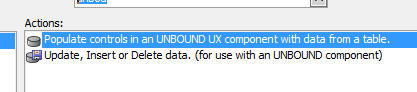
A List with an updateable Detail View also allows you to perform CRUD operations against a SQL database, and therefore represents an alternative to the above techniques.
NOTE: It is possible to continue to use Data Binding along with Lists with updateable Detail Views.
If you define Data Binding using the Data Binding pane in the UX builder (see image at top of section), you are said to be defining the data binding at the 'UX level'. When you define the data binding at the UX level your UX can only perform CRUD actions against a single set of linked tables (i.e. the tables that the UX is data bound to).
However, if you use Lists with Detail View to perform your CRUD actions, then you can update multiple independent sets of tables. That's because you can have multiple Lists on the UX, each with its own 'data binding' definition (i.e. the data binding is done at the 'List' level)
Choosing whether to create a UX that does CRUD operations against a SQL database by defining data binding at the UX level, or by creating a List with an updateable Detail View is a matter of personal preference. Both methods have their advantages.
However, if you want to build an application that can be used while disconnected, then you must use the List with Detail View method.
Configuring a List Control for Disconnected Applications
When you are building an application for disconnected usage there are certain List control properties that must be carefully considered. These are:Pagination - The 'pagination' option for the List should not be checked. With pagination turned on, you only load one 'page' of data into the List at a time. You then go back to the server each time a new 'page' of data is requested. Since the application is designed for disconnected usage, you will not be able to go back to the server to get more data.
For a disconnected application, you want to load all of the 'relevant data' into the List while you have a connection (i.e. beforeyou go offline). If all of the 'relevant' data turns out to be a large number of rows, then you will want to turn on the 'list virtualization' feature to improve the List performance (see below).
You can add a Search Part to the List to allow the user to search for the 'relevant data' that they want to have available when they are disconnected (see below).
List virtualization - If your List has a large number of rows in it, turn on virtualization (on the List Properties pane in the List Builder). With List virtualization, the List performance is substantially improved because only a subset of the List rows are rendered.

Search Part - By adding a Search Part to the List and checking the 'Delay populate till active search' property, you allow the user to search for 'relevant' data while they have a connection (i.e. before they go offline).
If the user enters search criteria that are not sufficiently restrictive and tries to load too much data into a List your application should display an error and inform the user to enter more restrictive search criteria.
METHODS
UX Component Methods
The following are new methods for the UX component. These methods apply to UX components that contain Lists which have Detail Views.{dialog.object}._getDirtyLists() - Returns an array of the Lists that are dirty. See also ._hasDirtyLists().
{dialog.object}._getListForDetailViewControl(colName) - If the specified colName is in the Detail View of any List control on the UX, returns the name of the List control.
var listName = {dialog.object}._getListForDetailViewControl('state');
{dialog.object}._hasDirtyLists() - Returns true if any List on the UX is dirty. See also ._getDirtyLists().
{dialog.object}._isControlInListDetailView(colName) - Returns true if the colName is inside the Detail View of any List control on the UX
var flag = {dialog.object}._isControlInListDetailView('firstname');
{dialog.object}.persistListToLocalStorage(ListId) - Manually persist List data and state to Local Storage (assuming the List properties have been set to allow persistence to Local Storage). Normally this method is not needed because the List is automatically persisted to Local Storage any time the List contents is changed (by adding, deleting or editing data in the List).
{dialog.object}.refreshListData() Method - Incremental Refresh Option - The .refreshListData() method makes an Ajax callback to refresh the data shown in a List control. By default, the Ajax callback computes a new set of data to show in the List, sends that data back to the client, completely repopulating the List.
NOTE: If the List has any unsynchronized edits you cannot execute the .refreshListData() method.
You can specify that you want to perform an 'incremental' refresh, rather than a 'full' refresh. The syntax is:
{dialog.object}.refreshListData(listId,{mode: 'incremental'});
{dialog.object}.refreshListData(listId,{mode: 'full'});
If the optional second argument is omitted, a full refresh is assumed.
In the case of an 'incremental' refresh, only data for rows that have been edited or added to the the database since the time the List was initially populated are sent to the client. In addition, a list of keys that have been deleted is also sent to the client. This may result in a substantially smaller payload being sent back to the client - especially if only a few rows have been edited or added. The size of the payload is important in mobile applications.
The main benefit of this option is the reduction on the response payload. There is a small cost in terms of the load placed on the server, as the server has to determine which records have changed.
Also, the payload of the initial request from the client to the server to request a refresh is slightly larger because a list of primary keys and their CRC values has to be sent to the server.
IMPORTANT: In order to use the 'incremental' refresh option, you must set the Include CRC in List data property to true.
{dialog.object}.refreshListsIncremental() - Performs an incremental refresh on all Lists. This method simply executes the standard {dialog.object}.refreshListData() method, passing in the optional {mode: "incremental"} parameter to the method.
An incremental refresh differs from a full refresh in that only rows that were edited on the server after the List was initially populated are sent to the client. An incremental refresh can only be done if the List's Include CRC in List data property has been checked.

{dialog.object}.saveListEdits(listId [,options] ) - Synchronizes edits that have been made to the List (and any of its child Lists). By default, edits from all dirty rows in the List are submitted to the server. You can optionally specify that just the edits for the currently selected row should be submitted to the server (by passing in {rows: 'current'} in the optional optionsparameter.
If the List is based on a SQL data source, the data are automatically saved to the table(s) on which the List is based. Alpha Anywhere automatically generates the necessary SQL CRUD statements from the submitted data.
If the List is not based on a SQL data source (for example the Data Source property of the List is set to 'Custom', 'Static', 'Javascript', etc.), then you must write your own synchronization handler to persist the submitted data.When you submit multiple dirty rows of data you can choose to submit all rows at once, or you can submit data in batches. The batch size can be specified in the List properties, or you can override the setting in List properties by specifying an option in the JSON options passed in as the second parameter to the method. For example:
{dialog.object}.saveListEdits('LISTCUSTOMERS',{rows: 'allRows', batchSize: 10});
When you submit data in batches, the first batch is submitted, then once that batch is synchronized a subsequent callback is triggered to submit the next batch, and so on, until all of the dirty rows have been submitted. The user can cancel before all batches have been submitted. If the user does cancel, the current batch that is being processed will continue to process, but once this batch completes, no further batches will be sent to the server.
- calls the List's .harvestList() method to get all of the dirty data to submit to the server
- makes an Ajax callback and submits the List data
- performs server-side validation of the submitted data.
- if server-side errors are found, compute the necessary Javascript to return information about the errors to the List so that the Detail View controls can be decorated with the appropriate error messages.
- if any write conflicts were found on the server (because another user had edited any of the records that were edited in the List), compute the necessary Javascript to return information about the conflicts to the user so that she may resolve them.
- computes an Ajax response to refresh the rows in the List that were updated and remove the 'dirty' flags from List rows that were previously marked as 'dirty'.
When you configure the List control you can set the synchronization policy to control whether 'server-to-client' synching should take place.
Since 'server-to-client' synching is a more expensive operation than 'client-to-server' synching, you might want to turn this option off and instead provide a menu choice to the client to explicitly do a 'server-to-client' synch. To do an explicit 'server-to-client' synch, you can all this method:
{dialog.object}.refreshListData(listId,{mode: 'incremental'});
NOTE: When you specify the 'incremental' mode any rows in the List that are dirty will not be refreshed.
Lists with Hierarchical Data
If you have Lists with hierarchical data, when you synchronize any List in the hierarchy, all of the Lists in the hierarchy are synchronized. The data sent back to the server by default includes the top level parent record and only the dirty child records. However, when synchronizing hierarchical data you can optionally submit all child records to the server (including records that were not edited).
To indicate that you want to submit all child records, not just dirty child records, set the 'allChildRecords' flag in optional arguments, as shown below:
{dialog.object}.saveListEdits('LIST',{rows: 'allRows', allChildRecords: true});
NOTE: It only makes sense to submit all child records to the server if you have defined a custom synchronization handler. The option to define a custom synchronization handler is only available if the List data source is set to Custom or Static.
For example, say you have this hierarchy:
Customer List
Orders List
OrderDetails List
In other words, the OrderDetails List specifies that the Orders List is its parent, and the Orders List specifies that the Customer List is its parent, and the two child Lists (Orders and OrderDetails) specify that their data is pre-loaded.
In this example, the Customer List will contain all of the data for its child Lists.
When you synchronize edits at any level in the hierarchy, the 'logical' record is submitted to the server. The 'logical' record is the top-level parent record, and all of the child records. As mentioned above, by default, the 'logical' record only includes leaf node child records that are dirty. However, if you set the allChildRecords flag to true then the composite record that is submitted to the server is the complete record (including clean child records).
{dialog.object}.synchronizeLists([options]) - Synchronizes all Lists. This method just calls the .saveListEdits()method for each List on the component. See .saveListEdits() for more information.
The options options object is described in the section covering the .saveListEdits() method.
List Methods - Detail View Part
The following List methods can be used for Lists that have a Detail View part:
NOTE: In order to invoke any of these methods, your Javsascript code must first get a pointer to the List object. For example:
var listObj = {dialog.object}.getControl('LIST1');
listObj.nameOfListMethodToInvoke();
<listObj>.addTableRow(data [,options]) - Adds a new row of data to a List that has a Detail View
Where:
- data - an object with the values in the List that you want to set.
- options - an object with optional settings.
The options object can contain these properties:
options.setFocusToTargetRow - true/false - If true, then focus will be given to the target row. The default for this property is false.
Example:
//create a data object with values for the columns in the List you want to edit
var data = {};
data.FIRSTNAME = 'Cecelia';
data.LASTNAME = 'Longwood';
//define optional settings
var ops = {};
ops.setFocusToTargetRow = true;
//get a pointer to the List control and then call the .updateTableRow() method
var lObj = {dialog.object}.getControl('CUSTOMERLIST')
lObj.addTableRow(data,ops);
Contrast the .addTableRow() method with the List object's .appendRows() method.
The .addTableRow() method is the programmatic equivalent of the user entering some values into the List Detail view controls and then clicking on the Save button to save their changes back to the List. When the user does this, the List becomes dirty and the edits that have been made to the list can be synchronized with the server.
The .appendRows() method is a low level method that adds the data to the List, but this method does not add the necessary information to the List to cause the List row that was added to become dirty. The new row cannot be synchronized with the server.
TIP: To programmatically update a table row see the .updateTableRow() method.
<listObj>.detailViewIsDirty() - Returns true/false if the controls that show the Detail View are dirty or not.
<listObj>.disableDetailView([flag]) - disables all of the controls in the Detail View. If flag is false, enables all controls.
<listObj>.fieldIsDirty(field [, rowNumber]) - Returns true if the specified field is dirty. If the rowNumber is not passed in the currently selected row is used. For new records, the field is considered dirty if it is not blank.
<listObj>.harvestListRow([zeroBasedRowNum]) - gets a JSON object of the data in the row. If row is an existing row, the object includes an _oldData object with the original values in the row. If the optional row number is not passed in, the current row is harvested.
<listObj>.harvestList([flagPrimaryKeysOnly]) - gets an array of JSON objects for each row in the list that is either dirty, or a new row;
You can optionally pass in a flag (true/false) to indicate that you want an array of primary keys for the dirty rows.
<listObj>.listIsDirty() - Returns true if the List control has any dirty rows. A 'dirty' row is an edited row, or new row that has not yet been committed on the serever side. See also {dialog.object}._hasDirtyLists()
<listObj>.listRowIsDirty([zeroBasedRowNum]) - Returns true if the current row in the List is dirty. You can optionally specify a zero based row number.
<listObj>.listRowIsNew([zeroBasedRowNum]) - Returns true if the current row in the List is a new row. You can optionally specify a zero based row number.
<listObj>.newDetailViewRecord() - Sets all of the controls in the List Detail view to their 'new record' value and unselects the current row in the List.
<listObj>.populateUXControls() - populates UX controls with data from the List. This method is internal - it is called automatically when the onSelect event fires if the List has a Detail View.
<listObj>.resetForm([options]) - Resets the Detail View form. Options is an optional JSON object with these properties:
prompt - true/false - if true, prompts for confirmation before resetting the form
<listObj>.resetRow([options]) - Resets a List row that has been edited to its original values. If the row has been marked as deleted, then 'un-deletes' the row. Options is an optional JSON object with these properties:
prompt - true/false - if true, prompts for confirmation before resetting the form.
<listObj>.setRowClean([zeroBasedRowNum]) - sets the row state to clear. If row num is not specified, current row.
var lObj = {dialog.object}.getControl('list1');
lObj.setRowClean();
<listObj>.setServerSideError(flag [, zeroBasedRowNum [, errorObject]]) - Used internally to put information about server side errors into the List's data object.
Sets the data object ._hasServerSideError flag to true or false;
If flag is true then also sets the data object's .serverSideErrors object to the passed in errorObject
<listObj>.updateListFromUXControls() - Updates the data in the List with edits made in the List's Detail View controls.
var lObj = {dialog.object}.getControl('list1');
lObj.updateListFromUXControls();
<listObj>.updateTableRow(primaryKeyOrRowNumber,data [,options]) - Updates data in a row in a List that has a Detail View.
Where:
- primaryKeyOrRowNumber - The primary key value or row number (zero based) of the row you want to update. If this argument is a string then it is assumed to be a primary key value. If it is a number, then it is assumed to be a row number. The primary key of the List is specified in the List builder.
- data - an object with the values in the List that you want to set.
- options - an object with optional settings.
options.setFocusToTargetRow - true/false - If true, then focus will be given to the target row. The default for this property is false.
Example:
//create a data object with values for the columns in the List you want to edit
var data = {};
data.FIRSTNAME = 'Cecelia';
data.LASTNAME = 'Longwood';
//specify the primary key of the row to update
var primaryKey = '1234';
//define optional settings
var ops = {};
ops.setFocusToTargetRow = true;
//get a pointer to the List control and then call the .updateTableRow() method
var lObj = {dialog.object}.getControl('CUSTOMERLIST')
lObj.updateTableRow(primaryKey,data,ops);
Contrast the .updateTableRow() method with the List object's .updateRow() method.
The .updateTableRow() method is the programmatic equivalent of the user entering some values into the List Detail view controls and then clicking on the Save button to save their changes back to the List. When the user does this, the List becomes dirty and the edits that have been made to the List can be synchronized with the server.
The .updateRow() method is a low level method that updates the data in a row, but this method does not add the necessary information to the List to cause the List row that was edited to become dirty. It does also not add the ._oldDataobject to the List to store the original values that were in the List row before it was edited. The changes that were made to the List cannot be synchronized with the server.
TIP: To programmatically add a table row see the .addTableRow() method.
<listObj>._ClearServerSideErrors([zeroBasedRowNum]) - Used internally. Clears error messages from the Detail View controls.
<listObj>._debugListData() - shows the contents of the data object for the current row in the List. You must have specified a placeholder for the debug information.
<listObj>._getControlsInDv() - Returns an array of all of the controls in the Detail View. Only controls that actually exit are returned. For example, say you specified that the Detail View is all of the controls in a container called 'CONTAINER_1' and one of the controls in this container is called 'SHIPPING_ADDRESS', but the List does not have a field called 'SHIPPING_ADRESS'. The array of controls returned by this function will not include the 'SHIPPING_ADDRESS' control.
<listObj>._getListFieldFromControl() - Takes the name of a Detail View control and returns the field name in the List that the control is mapped to.
<listObj>._getRoute() - For use with Lists that contain hierarchical data. Gets an array of objects with the current row primary key value (default) or row number in all Lists in the hierarchy. Each object in the array has two properties: list an row. 'list' is the name of the List, and row is the current (zero based) row number that is selected.
For example, say you have three Lists - CUSTOMERS, ORDERS, ORDERDETAILS.
var lObj = {dialog.object}.getControl('CUSTOMERS');
var route = lObj._getRoute()
This will return an array that might look like this:
[
{list: 'CUSTOMERS', row: 'ALFKI'},
{list: 'ORDERS', row: '11063',
{list: 'ORDERDETAILS', row: '11063|||27'}
]
To use row numbers:
var route = lObj._getRoute('rowNumber');
<listObj>._hasClientSideError() - returns true if any control in the List Deail View has a client-side validation error.
TIP: The placeholders that you specify for the Global Error Message and the Fade-out Message will consume space in the Layout. You can wrap then in a NoFloat container and set the float property of the container iself to .f. so that they don't consume space.
<listObj>._logicalRow2PhysicalRow() - Takes the logical row number (the value of the *key property in the data object - also the same as the row number in the data when it is loaded - before any client side sorting/filtering) and converts to a physical row number in the current sorted/filtered client side view of the data.
<listObj>._setRoute(routeArray) - For use with Lists that contain hierarchical data. Sets the selected row on each List in the routeArray. See ._getRoute() method for more details.
NOTE: If you don't pass in a routeArray to the method, the method will look for a value in the <listObj> '__currentRoute' property. This property is automatically set when you call the {dialog.object}.saveListEdits() method.
<listObj>._showServerSideErrors([zeroBasedRowNum]) - Used internally. Paints error messages on the Detail View controls using information stored in the List data .serverSideErrors object.
List Methods - Search Part
The following List methods can be used for Lists that have a integrated Search part:NOTE: In order to invoke any of these methods, your Javsascript code must first get a pointer to the List object. For example:
var listObj = {dialog.object}.getControl('LIST1');
listObj.nameOfListMethodToInvoke();
<listObj>.searchModeOn() - If the List Search Part is set to 'QueryByForm' then turns search mode on.
Example:
var lobj = {dialog.object}.getControl('LIST1')
lobj.searchModeOn();
TIP: The search mode can be displayed by adding a Label control to the UX and setting the control's client-side calculated expression to:
dialog.listDetailView.LISTNAME.mode
where 'LISTNAME' would be replaced by the actual List name (in capitals).
<listObj>.searchModeOff() - If the List Search Part is set to 'QueryByForm' then turns search mode off.
Example:
<listObj>.searchList([options]) - Submits the Search Part to search the List. You can specify if the search should be performed client-side, server-side or 'auto'.
- options - an optional JSON format string that indicates where the search should be performed (client-side or server-side). In the case of server-side search, you can set additional optional properties
- searchMode - can be set to clientSide, serverSide or auto. The 'auto' option performs a server-side search if the List is not 'dirty' (i.e. does not have any unsynchronized edits). Otherwise, it performs a client-side search.
- maxRows - in the case of a server-side search, indicates the maximum number of rows that the search is allowed to return. This property overrides the property that is set in the List Builder on the Search Part pane.
- maxPayload - in the case of a server-side search, indicates the maximum payload that the search is allowed to return. This property overrides the property that is set in the List Builder on the Search Part pane.
{dialog.object}.getControl('LIST1').searchList({searchMode : 'auto', maxRows: 30});
TIP: The beforeSearch client-side event fires before the search is performed. This event exposes the searchWhereproperty that tells you where the search will be performed.
<listObj>.clearSearchList([options]) - Removes any filter previously applied by submitting the Search Part.
See .searchList() method for information about options.
<listObj>.queryByFormClearControls() - Removes the search criteria from the Detail View form when the List is in 'search' mode.
Events
- beforeSearch - Fires before the search is executed. The 'e' object passed into the event has these properties: searchMode - 'search' (user is performing a search) or 'clear' - user is clearing a previously applied search and searchWhere - 'clientSide' or 'serverSide'.
- afterSearchComplete - Fires after the search has executed. The 'e' object passed into the event has these properties:searchMode - 'search' (user is performing a search) or 'clear' - user is clearing a previously applied search andrecordsInQuery - a count of the number of records found by the search.


Comment